 Save It
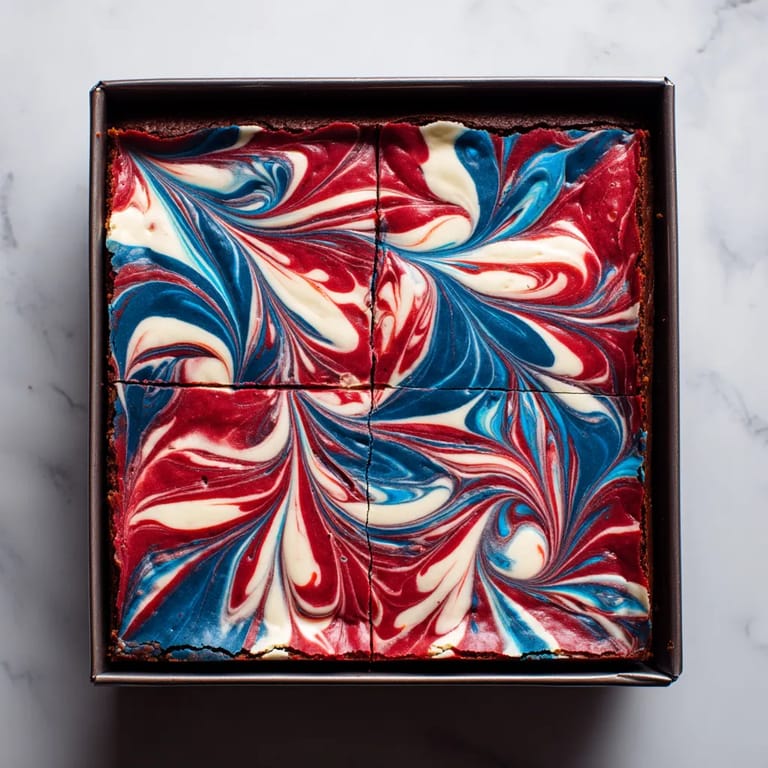
 This fudgy chocolate brownie recipe combines rich, decadent chocolate with vibrant red, white, and blue cheesecake swirls to create a showstopping dessert. Perfect for Fourth of July celebrations, Memorial Day barbecues, or any patriotic gathering, these marbled brownies deliver both impressive visual appeal and incredible flavor in every bite.
I first created these brownies for a neighborhood Fourth of July block party, and they disappeared faster than the fireworks overhead. Now they're requested at every summer gathering, with friends texting me weeks in advance to make sure I'll be bringing "those amazing red, white and blue brownies."
Ingredients
- 1 stick unsalted butter: Provides richness and moisture. Use high-quality butter for best results
- 8 oz semi-sweet chocolate (chopped): The backbone of any good brownie. Choose a quality brand around 60% cacao for perfect balance
- 3/4 cup granulated sugar: Sweetens while helping create that crackly top layer brownies are famous for
- 1/4 cup brown sugar: Adds depth and moisture. The molasses content helps keep brownies fudgy
- 2 large eggs: Provide structure and richness. Room temperature eggs incorporate better
- 1 tsp vanilla extract: Enhances chocolate flavor. Pure vanilla extract makes a noticeable difference
- 1/2 cup all-purpose flour: Just enough for structure without making brownies cakey
- 1/4 tsp salt: Balances the sweetness and enhances chocolate flavor
Tired of Takeout? 🥡
Get 10 meals you can make faster than delivery arrives. Seriously.
One email. No spam. Unsubscribe anytime.
- 8 oz cream cheese (softened): Full-fat works best for creamiest texture. Take it out 1 hour before baking
- 1/4 cup granulated sugar: Sweetens the tangy cream cheese perfectly
- 1 large egg yolk: Adds richness without thinning the cheesecake mixture
- 1/2 tsp vanilla extract: Complements the cream cheese flavor
- Red and blue gel food coloring: Gel colors provide vibrant hues without adding excess liquid
Step-by-Step Instructions
- Preparation:
- Preheat your oven to 350°F and prepare your baking pan. Line an 8x8 inch pan with parchment paper, leaving some overhang for easy removal. The parchment prevents sticking and makes cleanup much easier.
- Create the Brownie Base:
- Melt chocolate and butter together in a medium saucepan over low heat. Stir constantly to prevent scorching, watching for that perfect glossy moment when everything is just melted. Remove immediately from heat to prevent the chocolate from becoming grainy.
- Develop the Brownie Structure:
- Add both sugars to the chocolate mixture while still warm, whisking vigorously until fully incorporated. This helps dissolve the sugar crystals for a smoother texture. Let the mixture cool slightly before adding eggs one at a time, mixing thoroughly after each addition. The mixture should become shiny and slightly thickened.
- Complete the Brownie Batter:
- Gently fold in flour and salt with a rubber spatula, mixing just until no dry streaks remain. Overmixing at this stage can make brownies tough. The batter should be thick and glossy. Pour this luxurious mixture into your prepared pan, spreading evenly to the corners.
- Make the Cheesecake Mixture:
- Beat softened cream cheese with an electric mixer until completely smooth, about 2 minutes. Any lumps now will remain visible in the final product. Add sugar and beat until just incorporated, then mix in egg yolk and vanilla until the mixture is silky smooth.
- Create Colorful Layers:
- Divide the cheesecake mixture evenly between three small bowls. Leave one portion white, color one vibrant red, and the third a bold blue using gel food coloring. Start with just a small amount of coloring and gradually increase until you reach your desired shade.
- Create the Marble Effect:
- Drop alternating spoonfuls of each colored cheesecake mixture across the top of the brownie batter, creating a random pattern. Use about 1 tablespoon per dollop, spacing them evenly across the surface. Using a toothpick or thin skewer, swirl the colors together with light, flowing motions. Avoid overmixing which can muddy the distinct colors.
- Bake to Perfection:
- Bake in the preheated oven for 30 to 35 minutes. The brownies are done when the edges are set but the center still has a slight jiggle. A toothpick inserted in the center should come out with a few moist crumbs, not wet batter. Let cool completely in the pan before cutting for cleanest slices.
 Save It
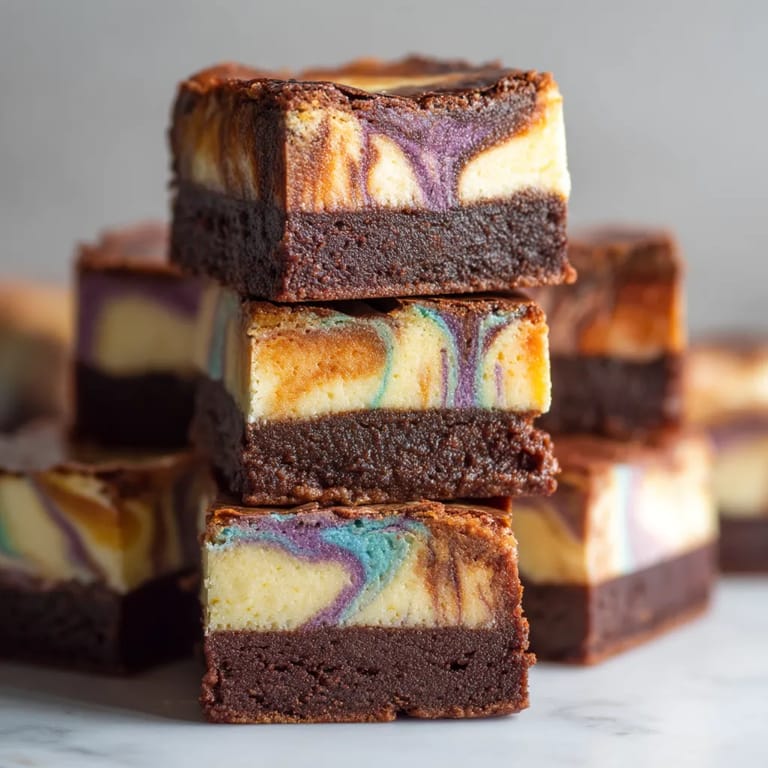
 The cheesecake swirl is truly the star of this recipe. I discovered the perfect technique after several failed attempts where my colors looked muddy rather than distinct. The secret is using gel food coloring and a very light hand when swirling. My daughter now claims mixing the colors is her special job, and she creates more beautiful designs than I ever could with her artistic touch.
Perfect Storage Solution
These brownies actually improve with a day of rest in the refrigerator, making them an ideal make ahead dessert for busy holiday gatherings. Store them in an airtight container with parchment paper between layers to prevent sticking. They keep well refrigerated for up to 5 days, though they rarely last that long in my house. For longer storage, wrap individual brownies tightly in plastic wrap then aluminum foil and freeze for up to 3 months. Thaw overnight in the refrigerator before serving.
Save It Simple Substitutions
While the classic red, white and blue version is perfect for patriotic holidays, you can easily adapt this recipe for other occasions. For Halloween, use orange and black swirls. School colors work great for graduation parties or sports celebrations. During winter holidays, red and green create a festive look. For those with dietary considerations, gluten free all-purpose flour can be substituted one to one for regular flour. You can also use dairy-free cream cheese alternatives and plant-based butter with good results, though the texture may be slightly different.
Serving Suggestions
These brownies make a stunning centerpiece on any dessert table, especially when arranged on a white platter and garnished with fresh berries. For an extra special treat, serve slightly warmed with a scoop of vanilla ice cream and a drizzle of chocolate sauce. At summer gatherings, I like to create an interactive dessert station where guests can add their own toppings like whipped cream, sprinkles, or chopped nuts. For a more elegant presentation, cut brownies into small squares and serve on individual dessert plates with a light dusting of powdered sugar.
Common Questions About Recipes
- → Can I make these brownies ahead of time?
Yes! These brownies actually benefit from being made a day ahead. The flavors meld together and the cheesecake swirl sets up better after refrigeration. Make them up to 2 days in advance, store in the refrigerator, and bring to room temperature before serving.
- → Can I substitute liquid food coloring for the gel coloring?
While you can use liquid food coloring, gel coloring is highly recommended. Liquid coloring may add too much moisture to the cheesecake mixture, potentially changing its texture and creating less vibrant colors. If using liquid, use very small amounts to avoid altering the consistency.
- → How do I achieve clean cuts on my brownies?
For perfect cuts, refrigerate the brownies for at least 2 hours before slicing. Use a sharp knife dipped in hot water and wiped clean between each cut. This prevents the fudgy brownie and cheesecake from sticking to the knife and creates professional-looking slices.
- → Can I double this recipe for a larger crowd?
Yes! Double all ingredients and bake in a 9x13-inch pan. You may need to increase the baking time by about 5-10 minutes. Check doneness by inserting a toothpick in the center - it should come out with a few moist crumbs but not wet batter.
- → How do I create the best marbled effect?
For beautiful marbling, drop alternating spoonfuls of colored cheesecake mixture over the brownie batter. Use a toothpick or skewer to gently swirl with a light hand - avoid overmixing, which can muddy the colors. Make figure-eight motions for an artistic pattern.
- → Can I make these brownies gluten-free?
Yes, you can substitute the all-purpose flour with a 1:1 gluten-free flour blend designed for baking. The dense, fudgy nature of these brownies makes them very adaptable to gluten-free flours. Just ensure your chocolate and other ingredients are also certified gluten-free.