 Save It
 This homemade veggie chip recipe transforms ordinary root vegetables into crispy, colorful snacks that pair perfectly with a creamy ranch dip. I developed this recipe after searching for healthier alternatives to store-bought chips, and it's become my go-to for everything from movie nights to dinner parties.
I first made these veggie chips when trying to impress health conscious friends at a gathering. What started as an experiment has turned into my most requested recipe whenever I host. The colorful presentation never fails to wow guests before they even take their first bite.
Ingredients
- Medium beet: The earthiness and natural sweetness intensifies when baked. Look for firm beets with smooth skin.
- Medium sweet potato: Offers a perfect balance of sweetness and earthy flavor. Choose ones with unblemished skin.
- Zucchini: Provides a mild flavor that takes on seasonings beautifully. Select small to medium sized for best flavor.
- Carrot: Adds natural sweetness and bright color. Choose firm carrots with vibrant orange hue.
- Olive oil: Helps achieve crispiness and enhances flavor. Extra virgin gives the best taste.
- Sea salt: Brings out the natural flavors of the vegetables. Flaky sea salt works particularly well.
- Optional seasonings: Smoked paprika adds smokiness, garlic powder adds savory notes, black pepper adds mild heat.
Tired of Takeout? 🥡
Get 10 meals you can make faster than delivery arrives. Seriously.
One email. No spam. Unsubscribe anytime.
For the Ranch Dip
- Sour cream: Creates the creamy base of the dip. Full fat provides the richest texture.
- Mayonnaise: Adds richness and tanginess. Choose a quality brand for best results.
- Lemon juice: Brightens all the flavors. Fresh squeezed gives the cleanest taste.
- Dried dill: The signature herb in ranch flavor. Make sure yours is fragrant and not too old.
- Garlic powder: Provides depth without overwhelming. Look for garlic powder without added salt.
- Onion powder: Adds subtle savory notes. Always check freshness by smelling before using.
- Fresh herbs: Chives or parsley add color and fresh flavor. Always use the freshest herbs possible.
Step-by-Step Instructions
- Prepare the Oven:
- Preheat your oven to 300°F and line two baking sheets with parchment paper. The lower temperature is crucial for slowly dehydrating the vegetables rather than quickly burning them.
- Prepare the Vegetables:
- Use a mandoline slicer to cut all vegetables into paper thin slices about 1/16 inch thick. Consistent thickness is the secret to even cooking. Then thoroughly pat the slices dry with paper towels, pressing gently to remove as much moisture as possible.
- Season the Vegetables:
- Place vegetables in a large bowl and drizzle with olive oil. Use your hands to gently toss and ensure each slice gets a light, even coating. Sprinkle with sea salt and any additional seasonings, being careful not to oversalt.
- Arrange for Baking:
- Lay vegetable slices in a single layer on the prepared baking sheets, making sure they don't overlap. Overcrowding will result in steaming rather than crisping. You may need to bake in batches.
- Bake to Perfection:
- Place in preheated oven and bake for about 15 minutes, then carefully flip each slice with tongs or a spatula. Continue baking for another 10 to 20 minutes, watching closely as different vegetables crisp at different rates. Beets and sweet potatoes typically take longer than zucchini.
- Cool Properly:
- Transfer chips to a wire cooling rack immediately after removing from the oven. They will continue to crisp as they cool, so even if they seem slightly bendy when hot, they should harden nicely.
- Prepare the Ranch Dip:
- While the chips are baking, combine all dip ingredients in a medium bowl. Whisk until completely smooth, then taste and adjust seasonings as needed. Refrigerate for at least 15 minutes to allow flavors to meld.
- Serve and Enjoy:
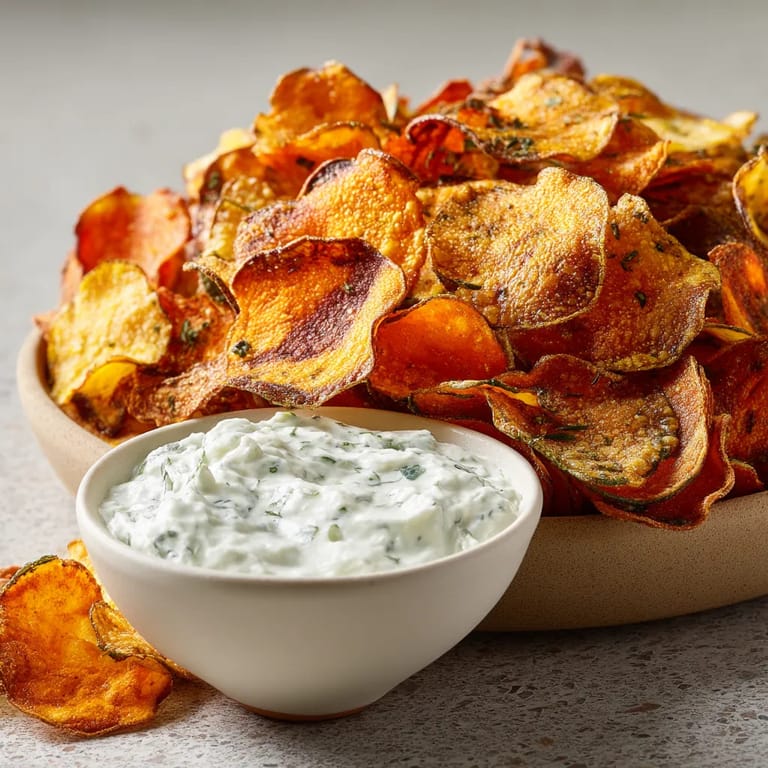
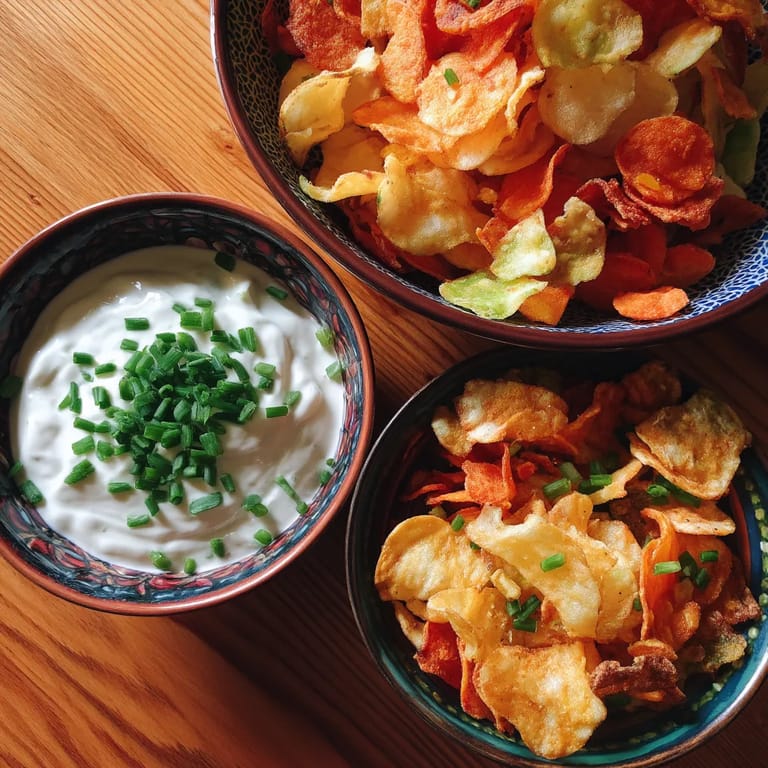
- Arrange cooled chips in a serving bowl alongside the chilled ranch dip. For best texture and flavor, serve the chips the same day they're made.
 Save It
 For me, the sweet potato chips are always the first to disappear from the bowl. My partner claims I always save them for myself, but truthfully, their natural sweetness paired with a hint of sea salt creates the perfect balance that I simply cannot resist. The first time my niece tried these, she asked if the colorful chips were "magical vegetables" since they tasted so different from their regular forms.
Save It Storage Tips
While these chips are best enjoyed immediately after cooling, you can store them in an airtight container with paper towels between layers to absorb moisture. They will keep for about 2 days but will gradually lose their crispness. To revive slightly softened chips, place them in a 250°F oven for 10 minutes.
The ranch dip can be stored in an airtight container in the refrigerator for up to 4 days. Give it a good stir before serving if any separation occurs. The flavors actually improve after the first day as the herbs fully infuse the creamy base.
Troubleshooting Common Issues
If your chips aren't crisping properly, there are three likely culprits. First, the vegetable slices might be too thick. Second, you may have overcrowded the baking sheet. Third, some vegetables naturally contain more moisture than others. For particularly watery vegetables like zucchini, try salting the slices and letting them sit for 15 minutes before patting dry and baking.
Burning can happen quickly, especially with thinner vegetables. The key is positioning your oven racks in the middle, not too close to heating elements, and checking frequently during the last 10 minutes of baking. Remember that darker vegetables like beets can be harder to judge for doneness, so err on the side of caution.
Veggie Selection Guide
Root vegetables generally make the best chips because of their lower moisture content and natural sugars that caramelize beautifully. Alongside those in this recipe, parsnips, turnips, and radishes make excellent additions. For leafy options, try kale or spinach, though these require even lower temperatures and shorter cooking times.
Avoid high moisture vegetables like cucumber or tomato, which never crisp properly. For vegetables like zucchini that have higher water content, slicing them extra thin and thoroughly drying them becomes even more important.
Common Questions About Recipes
- → How do I get my veggie chips perfectly crispy?
The key to crispy veggie chips is removing excess moisture, slicing them very thinly (using a mandoline if possible), patting them dry before baking, arranging them in a single layer without overlapping, and baking at a low temperature (300°F/150°C). They'll continue crisping as they cool on a wire rack.
- → Can I use other vegetables for these chips?
Absolutely! While beets, sweet potatoes, zucchini, and carrots work wonderfully, you can also try parsnips, turnips, radishes, or even kale. Just adjust cooking times as needed since different vegetables have varying moisture content and thickness.
- → How long do homemade veggie chips stay fresh?
Homemade veggie chips are best enjoyed fresh but can be stored in an airtight container for up to 2 days. They may soften slightly over time due to natural moisture in the vegetables. For maximum crispness, enjoy them the same day they're made.
- → Can I make the ranch dip dairy-free?
Yes! For a dairy-free ranch dip, substitute the sour cream with dairy-free yogurt (coconut, almond, or soy-based) and use vegan mayonnaise. Add a splash of lemon juice to mimic the tanginess of sour cream, and adjust seasonings to taste.
- → What's the best way to serve these veggie chips?
Serve these chips immediately after cooling for maximum crispness. Arrange them in a bowl or platter with the ranch dip on the side. They make an excellent appetizer, party snack, or accompaniment to sandwiches. For visual appeal, separate different vegetable varieties to showcase their vibrant colors.
- → Why are my veggie chips burning before getting crispy?
If your chips are burning, your oven temperature may be too high or the slices might be too thin. Try lowering the temperature to 250°F/120°C and extending the baking time. Different vegetables have varying sugar content (especially beets and sweet potatoes), which can cause them to brown faster, so it helps to group similar vegetables on the same tray.