 Save It
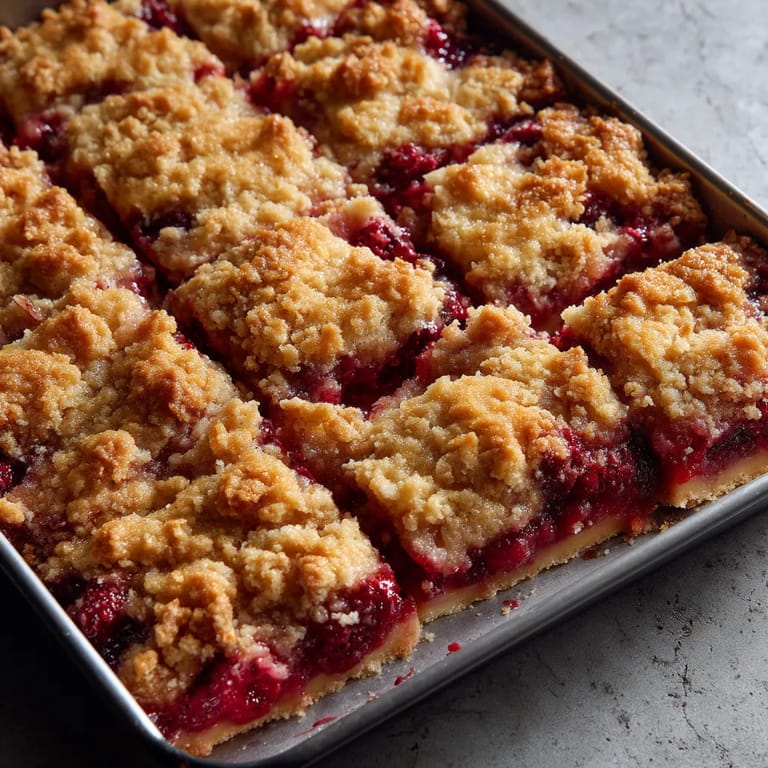
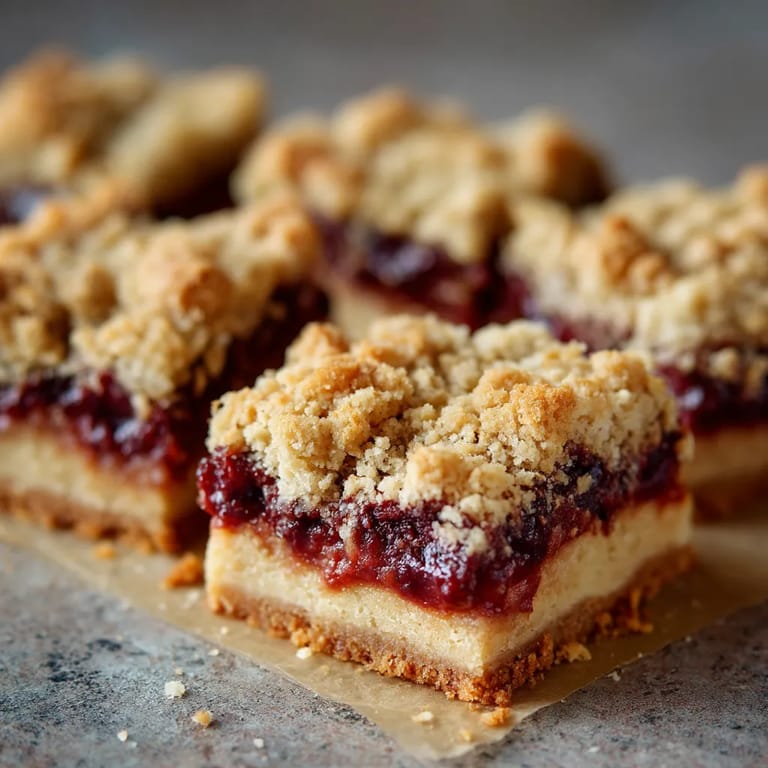
 This raspberry-apple crumble tray bake brings together the perfect balance of tangy fruit and sweet, buttery crumble in an easy-to-serve format. The combination of tender apples and juicy raspberries creates a vibrant filling that contrasts beautifully with the golden crumble crust and topping.
I first made this recipe for a weekend family gathering when I needed something that could be prepared ahead and served at room temperature. The tray was completely empty within hours, and now it's requested at nearly every family function.
Ingredients
For the Fruit Filling
Tired of Takeout? 🥡
Get 10 meals you can make faster than delivery arrives. Seriously.
One email. No spam. Unsubscribe anytime.
- Apples: Choose firm varieties like Braeburn or Granny Smith that hold their shape when baked
- Raspberries: Add beautiful color and a tangy contrast to the sweet apples
- Lemon juice: Brightens the flavors and prevents apples from browning
- Granulated sugar: Balances the tartness of the fruit
- Cornstarch: Thickens the fruit juices preventing a soggy bottom
- Vanilla extract: Adds warmth and depth to the fruit filling
For the Crumble Base & Topping
- All purpose flour: Provides structure for both the base and crumble topping
- Granulated sugar: Creates sweetness and helps with browning
- Light brown sugar: Adds caramel notes and moisture to the crumble
- Baking powder: Gives a slight lift to the base for a more tender texture
- Salt: Enhances all the flavors and balances sweetness
- Cold butter: Creates those perfect crumbly pockets throughout the topping
- Egg: Binds the base layer together while keeping it tender
- Ground cinnamon: Optional but adds wonderful warmth to complement the fruit
Step-by-Step Instructions
- Prepare the pan:
- Preheat your oven to 175°C (350°F) and line your baking tray with parchment paper, leaving some overhang on the sides to help lift out the finished bars. Make sure the paper is pressed into the corners for easy removal later.
- Mix the fruit filling:
- Gently toss the diced apples and raspberries with lemon juice first to coat everything evenly. This prevents oxidation. Then add the sugar, cornstarch, and vanilla, tossing until all fruit pieces are coated. Let this mixture sit while you prepare the crumble so the flavors can meld and the sugar can start to draw out some juice from the fruit.
- Create the crumble mixture:
- Whisk the dry ingredients thoroughly in a large bowl to ensure even distribution of the baking powder and salt. The cinnamon is technically optional, but it adds such a wonderful warmth that complements both the apples and raspberries. When cutting in the butter, work quickly with cold hands or a pastry cutter until you achieve pea-sized crumbs. Avoid overworking the mixture or the butter will warm too much.
- Form the base layer:
- Press about two-thirds of your crumble mixture firmly into the prepared tray. Use the bottom of a measuring cup to create an even, compact layer that will hold up to the fruit filling. Make sure to press the mixture into the corners and create a slight lip around the edges to contain the fruit juices.
- Add the fruit layer:
- Spread your fruit mixture evenly over the base, being careful not to disturb the crumble underneath. If there seems to be excessive liquid in the bowl, use a slotted spoon to transfer the fruit and leave behind some of the excess juice to prevent a soggy base.
- Top with remaining crumble:
- Crumble the remaining third of the mixture over the fruit by squeezing it in your hand to form larger clumps, then breaking them into various-sized pieces over the filling. This creates those delicious buttery clusters everyone fights over. Leave some fruit visible for a beautiful baked appearance.
- Bake to perfection:
- Bake in the center of your preheated oven for 40 to 45 minutes. You'll know it's done when the topping is golden brown and you can see the fruit filling bubbling around the edges. If the top is browning too quickly, loosely cover with foil for the last 10 minutes of baking.
- Cool before cutting:
- Let the tray bake cool in the pan for at least 20 minutes before attempting to cut. As it cools, the filling will set up and be much easier to slice neatly. For the cleanest cuts, you can even refrigerate it for an hour after it reaches room temperature.
 Save It
 My absolute favorite way to serve this is slightly warm with a dollop of double cream poured over the top. The contrast between the warm, fruity filling and the cold cream is absolutely divine. When my grandmother first tried this recipe, she declared it reminded her of the fruit crumbles she made during apple harvest season in her youth, only better because of the addition of raspberries.
Storage Tips
This crumble tray bake will keep well at room temperature for 2-3 days if covered with foil or stored in an airtight container. The crumble topping will soften slightly over time but will still taste delicious. For longer storage, refrigerate for up to 5 days, though the texture of the crumble will become more cake-like from the moisture.
If you want to freeze portions, cut the cooled tray bake into squares, wrap individual pieces in plastic wrap and then foil, and freeze for up to 3 months. Thaw overnight in the refrigerator and warm in a 300°F oven for 10-15 minutes to refresh the texture.
Versatile Variations
This base recipe is incredibly adaptable to whatever fruit you have on hand. Try swapping the raspberries for blackberries, blueberries, or even sliced peaches in summer. In autumn, increase the cinnamon and use all apples with a touch of nutmeg for a classic apple crumble. For a holiday version, add cranberries in place of raspberries and include orange zest in the filling.
The crumble topping can also be customized by adding 50g of chopped nuts like almonds or walnuts, or incorporating quick oats for more texture. For a hint of spice, try adding 1/4 teaspoon of ground cardamom or ginger to the topping mixture.
Serving Suggestions
While delicious on its own, this tray bake reaches new heights when served with accompaniments. For a breakfast treat, pair with Greek yogurt and a drizzle of honey. For afternoon tea, serve squares at room temperature alongside a cup of Earl Grey or English Breakfast tea.
For dessert, warm the squares slightly and serve with vanilla ice cream, custard, or whipped cream. If serving for a special occasion, create a simple raspberry sauce by simmering additional raspberries with sugar and a splash of liqueur, then straining and drizzling over each portion.
Save It Common Questions About Recipes
- → Can I use frozen raspberries instead of fresh?
Yes, frozen raspberries work perfectly in this crumble and don't need to be thawed first. The recipe specifically indicates you can use either fresh or frozen raspberries (250g/2 cups). The baking time remains the same.
- → How do I store leftover crumble?
Allow the crumble to cool completely, then cover the baking dish with foil or transfer portions to an airtight container. Store at room temperature for up to 2 days or refrigerate for up to 5 days. Reheat individual portions in the microwave for 30-60 seconds or warm the entire dish in a 325°F oven for 15-20 minutes.
- → Can I make this crumble gluten-free?
Yes, you can substitute the all-purpose flour with a 1:1 gluten-free flour blend. Ensure your baking powder is also gluten-free certified. The texture may be slightly different but will still produce a delicious result. Add 1/4 teaspoon xanthan gum if your blend doesn't include it for better structure.
- → What's the best type of apple to use?
Braeburn or Granny Smith apples are recommended as they hold their shape when baked and provide a nice tartness that balances the sweetness. Other good options include Honeycrisp, Pink Lady, or Jonagold. Avoid softer varieties like Red Delicious as they can become mushy during baking.
- → Can I prepare this crumble in advance?
Yes, you can prepare the crumble up to 24 hours in advance. Assemble the entire dish, cover with plastic wrap, and refrigerate. When ready to bake, remove from the refrigerator while preheating the oven, then bake as directed, adding 5-10 minutes to the baking time if starting from cold.
- → How do I know when the crumble is fully baked?
The crumble is done when the topping is golden brown and you can see the fruit filling bubbling around the edges. This usually takes 40-45 minutes at 175°C (350°F). If the top is browning too quickly but the filling isn't bubbling yet, cover loosely with foil and continue baking.