 Save It
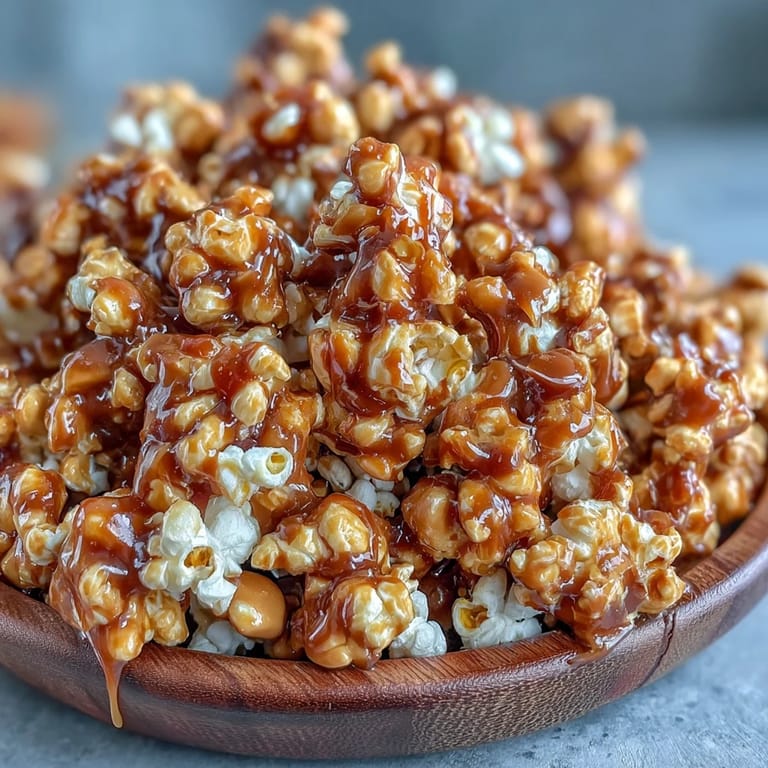
 My uncle showed up to my house one summer afternoon with a paper bag of homemade caramel popcorn mix, still warm from his kitchen, and I remember thinking this simple snack had somehow stolen the show at every family gathering he'd ever attended. He wouldn't give me the recipe for years, claiming it was his secret weapon for keeping the cousins happy during long baseball games on the back patio. When he finally relented and walked me through it, I realized the magic wasn't in anything fancy—it was in that moment when you pour hot caramel over popcorn and the whole bowl transforms into something irresistibly crunchy and golden. Now I make it for my own game days, and I've stopped trying to keep it a secret too.
I brought this to a neighborhood watch party one October, and the bowl was completely cleaned out before the second inning ended—someone actually asked if I'd made it with magic. That's when I knew this wasn't just a snack, it was the kind of thing that brings people together, the edible equivalent of a good conversation.
Ingredients
- Freshly popped popcorn (10 cups): Use an air popper or stovetop method rather than microwave bags, which tend to leave unpopped kernels that'll crack your teeth.
- Roasted, salted peanuts (1 cup): The salt in the peanuts is crucial—it echoes the kosher salt in the caramel and creates that addictive sweet-salty dynamic.
- Light brown sugar, packed (1 cup): Don't skip the packing step; loose brown sugar will throw off your caramel's consistency and texture.
- Unsalted butter (1/4 cup): Unsalted lets you control the salt level, which matters when you're balancing flavors this carefully.
- Light corn syrup (1/4 cup): This prevents crystallization and keeps your caramel smooth rather than grainy—it's the difference between silky and sandy.
- Kosher salt (1/2 teaspoon): Kosher salt dissolves more evenly than table salt, giving you better flavor distribution throughout the mix.
- Baking soda (1/4 teaspoon): This creates that characteristic foam and lightens the caramel, making it crunchy instead of chewy.
- Pure vanilla extract (1/2 teaspoon): It rounds out the caramel flavor with warmth and complexity that takes this from basic to memorable.
Tired of Takeout? 🥡
Get 10 meals you can make faster than delivery arrives. Seriously.
One email. No spam. Unsubscribe anytime.
Instructions
- Set your stage:
- Preheat your oven to 250°F and line a large rimmed baking sheet with parchment paper—this temperature is low enough to dry out the coating without burning anything. Have your popcorn and peanuts already mixed in a large bowl so you're ready to move fast once that caramel comes off the heat.
- Build your base:
- Pour 10 cups of freshly popped popcorn and 1 cup of roasted peanuts into a large mixing bowl and toss them together gently, making sure the nuts are distributed evenly. Set this aside and don't walk away from it yet—you'll need it in seconds.
- Make the caramel:
- In a medium saucepan, combine 1 cup packed brown sugar, 1/4 cup unsalted butter, 1/4 cup light corn syrup, and 1/2 teaspoon kosher salt over medium heat. Stir this constantly, watching it slowly transform from grainy and thick into a glossy, bubbling liquid—this usually takes about 5 to 7 minutes.
- Let it boil untouched:
- Once the caramel reaches a gentle rolling boil, stop stirring and let it bubble away for 4 to 5 minutes without touching it; this deepens the flavor and reaches the right consistency. You'll notice the mixture smells rich and toasty—that's when you know it's ready.
- Finish with the foam:
- Remove the pan from heat and immediately stir in 1/4 teaspoon baking soda and 1/2 teaspoon vanilla extract, which will cause the caramel to foam up dramatically. Work quickly and carefully since the mixture is still very hot.
- Coat everything evenly:
- Pour the hot caramel over your popcorn and peanuts mixture right away, and using two spatulas or wooden spoons, toss constantly until every piece is coated with that glossy caramel. This takes some elbow grease, but it's worth it—aim for about 2 to 3 minutes of tossing.
- Spread and bake:
- Transfer the coated mixture onto your prepared baking sheet in a single layer, spreading it as evenly as you can. Bake for 45 minutes, stirring the mixture every 15 minutes to ensure the caramel coating dries evenly and nothing burns on the edges.
- Cool and break apart:
- Remove from the oven and let the mixture cool completely on the baking sheet—this is when the caramel hardens and becomes crispy. Once it's cool enough to touch, break it into clusters of whatever size you prefer.
 Save It
 Last year, my eight-year-old helped me make this for her school fundraiser bake sale, and watching her carefully stir that foaming caramel with such concentration, then taste the first warm piece fresh from the cooling sheet, reminded me that these small kitchen moments teach her more than any cookbook could. She decided right then that this was her recipe now, and every time someone asks how to make caramel popcorn, she's the one who tells them.
The Sweet Spot Between Sticky and Crunchy
The real art of this snack lies in understanding that baking soda does more than just create that dramatic foam—it actually aerates the caramel, turning what could be a dense, chewy coating into something light and crispy that shatters between your teeth. The low oven temperature and frequent stirring work together to dry out the caramel completely rather than just setting it, which is why homemade versions taste so different from the dense, almost sticky texture of some store-bought brands.
Timing and Temperature Matter More Than You Think
I learned the hard way that if your caramel isn't quite at a full boil when you add the baking soda, it won't foam properly and the texture suffers; conversely, if you let it boil too long, the mixture becomes too thick and bitter. The oven temperature seems low, but it's deliberate—a hotter oven would brown or even burn the caramel while leaving the inside soft and uncooked. Think of it as a slow, patient process where nothing gets rushed.
Ways to Make It Your Own
Once you nail the basic recipe, the possibilities open up—I've added mini pretzel twists for extra crunch, scattered chocolate chips over the cooled mix, and even tried a pinch of cayenne pepper for a subtle heat that surprised everyone in the best way. The foundation is sturdy enough to handle variations, and experimenting is half the fun of owning a recipe rather than just following one.
- Mini pretzel twists or chocolate candies work best stirred in after the mix cools completely so they don't melt or get soggy.
- For a dairy-free version, swap in plant-based butter and the caramel works just as beautifully with the same texture and taste.
- Store it in an airtight container for up to a week, though it rarely lasts that long once people know it's in the house.
 Save It
 This recipe has become my go-to for moments when I want to show up somewhere with something handmade, something that feels like care in a bowl. It's proof that the best snacks don't need complicated techniques or rare ingredients—just attention, timing, and a willingness to let each step do what it's meant to do.
Common Questions About Recipes
- → How do I get the caramel to coat the popcorn evenly?
Pour the hot caramel quickly over the popcorn and peanuts, then use two spatulas to toss thoroughly, ensuring every piece is covered before baking.
- → Can I substitute peanuts with other nuts?
Yes, roasted almonds or cashews work well and add a different flavor and crunch to the mix.
- → What is the best way to store this snack mix?
Keep it in an airtight container at room temperature for up to one week to maintain crispness.
- → Is there a way to make this mix dairy-free?
Simply replace the unsalted butter with a plant-based alternative to keep it dairy-free without altering flavor much.
- → Can additional ingredients be added after baking?
Yes, after cooling, mix in mini pretzel twists or chocolate candies for extra texture and flavor contrast.