 Save It
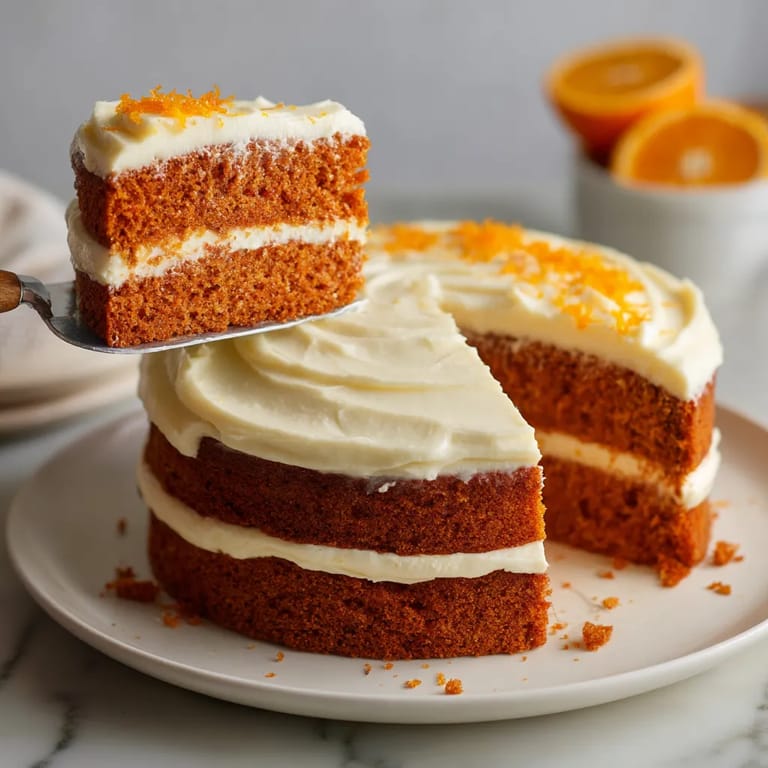
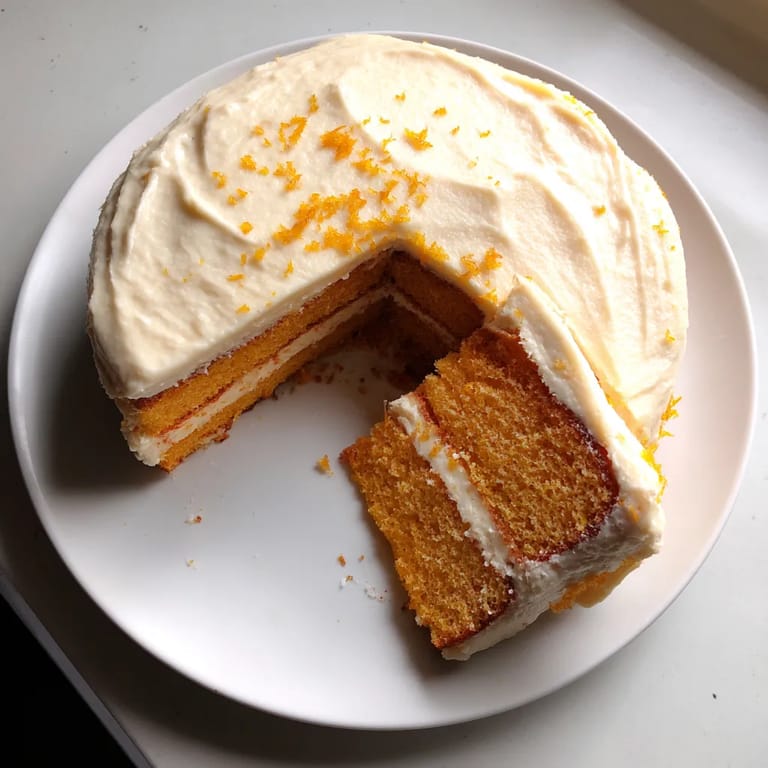
 This orange velvet cake is the perfect blend of tangy citrus and moist, tender crumb that will brighten any dessert table. With its vibrant orange flavor and silky cream frosting, it stands as a refreshing alternative to traditional red velvet cake while maintaining that same luxurious texture.
I first created this orange velvet cake for my daughter's spring birthday when she requested something "sunny and different." The bright citrus flavor was such a hit that it's now become our signature celebration cake for special occasions year-round.
Ingredients
- All purpose flour: Gives this cake its tender structure without becoming too dense
- Granulated sugar: Balances the citrus tang perfectly while helping create that velvety texture
- Fresh orange juice and zest: Provide the authentic flavor that makes this cake special look for heavy oranges with bright fragrant skin
- Buttermilk: Creates tenderness and reacts with the leavening agents for the perfect rise
- Unsalted butter: For both cake and frosting allows you to control the salt level while adding richness
- Vanilla extract: Complements the orange flavor without overpowering it
- Powdered sugar: Creates that silky smooth frosting texture that spreads beautifully
Tired of Takeout? 🥡
Get 10 meals you can make faster than delivery arrives. Seriously.
One email. No spam. Unsubscribe anytime.
Step-by-Step Instructions
- Prepare Your Workspace:
- Preheat oven to 350°F and prepare your cake pans thoroughly. A thin layer of butter followed by a light dusting of flour ensures your cakes will release perfectly after baking. Take extra care to get the corners and sides.
- Mix Dry Ingredients:
- Whisk the flour sugar baking powder baking soda and salt together until evenly distributed. This ensures leavening agents are properly dispersed throughout the batter preventing uneven rising or bitter spots.
- Blend Wet Ingredients:
- Beat the softened butter buttermilk eggs orange zest vanilla and orange juice until they form a smooth mixture. The room temperature ingredients are crucial here they blend more readily creating a smoother batter.
- Combine Batters Gently:
- Add the wet ingredients to the dry ingredients gradually and mix just until combined. Overmixing activates the gluten in the flour resulting in a tougher less tender cake. Stop mixing as soon as the last streaks of flour disappear.
- Bake To Perfection:
- Pour batter evenly between pans and bake until a toothpick comes out clean about 25 to 30 minutes. The cakes should just begin to pull away from the sides of the pan and spring back lightly when touched.
- Cool Completely:
- Allow the cakes to cool in pans for 10 minutes before transferring to a wire rack. This brief resting period allows the structure to set preventing breakage but removing them prevents condensation from making the bottoms soggy.
- Prepare The Frosting:
- Beat the butter until light and fluffy before adding powdered sugar. This initial beating incorporates air for a lighter texture. Add orange juice and zest gradually to achieve the perfect spreading consistency.
- Assemble With Care:
- Ensure cakes are completely cool before frosting to prevent melting. Place the first layer on your serving plate add a generous amount of frosting then top with the second layer before frosting the entire cake.
 Save It
 The orange zest is truly the secret weapon in this recipe. I learned from my grandmother to always zest the oranges before juicing them, and to rub the zest into the sugar with your fingertips before mixing. This releases the essential oils and intensifies the orange flavor throughout the cake.
Storage Secrets
This orange velvet cake actually improves with a little time, allowing the flavors to meld and deepen. After frosting, cover loosely with a cake dome and store at room temperature for up to two days. For longer storage, refrigerate for up to five days, but always bring to room temperature before serving to allow the butter in the frosting to soften for the best texture and flavor experience.
Clever Substitutions
If buttermilk isn't available, you can create a quick substitute by adding 1 tablespoon of lemon juice or white vinegar to 1 cup of regular milk and letting it sit for 5 minutes. For a dairy-free version, use plant-based butter and milk with the same acidification method. Blood oranges can be substituted when in season for a stunning pink-tinged cake with a slightly different flavor profile that guests will remember.
Save It Serving Suggestions
This orange velvet cake pairs beautifully with afternoon tea or coffee, but transforms into an elegant dessert when served with a small scoop of vanilla ice cream or a dollop of lightly sweetened whipped cream. For a truly special presentation, garnish with candied orange slices or fresh berries. The bright citrus flavor makes it an excellent finish to rich meals, cutting through heaviness with its refreshing taste.
The History Behind Orange Velvet
While red velvet cake has Southern roots dating back to the Victorian era, this orange variation represents a modern twist that maintains the traditional velvety texture while celebrating citrus flavors. Orange cakes have been popular in Mediterranean cuisines for centuries, where citrus grows abundantly. This recipe brings together American cake techniques with those flavor traditions, creating something both familiar and excitingly different.
Common Questions About Recipes
- → Can I make this cake ahead of time?
Yes, you can bake the cake layers 1-2 days in advance. Store them tightly wrapped at room temperature or refrigerated. The assembled frosted cake will stay fresh in the refrigerator for up to 3 days. Let it come to room temperature before serving for the best flavor and texture.
- → Can I substitute the buttermilk?
If you don't have buttermilk, make a quick substitute by adding 1 tablespoon of white vinegar or lemon juice to 1 cup of regular milk. Let it stand for 5 minutes before using. The acidity is important for proper texture and rise.
- → How do I ensure my cake is moist?
To guarantee moisture, avoid overmixing the batter, which can develop too much gluten. Be careful not to overbake - remove the cake when a toothpick inserted comes out with a few moist crumbs. The orange juice and buttermilk in this recipe also contribute significantly to the cake's moisture.
- → Can I turn this into cupcakes?
Absolutely! This batter makes approximately 24 cupcakes. Fill lined cupcake tins about 2/3 full and reduce the baking time to 18-22 minutes. Check for doneness with a toothpick test.
- → How should I store leftovers?
Store leftover cake in an airtight container in the refrigerator for up to 5 days. You can also freeze individual slices wrapped tightly in plastic wrap and aluminum foil for up to 3 months. Thaw overnight in the refrigerator before serving.
- → Can I make this cake without dairy?
For a dairy-free version, substitute the butter with an equal amount of dairy-free margarine or coconut oil. Replace buttermilk with a non-dairy milk (like almond or soy) mixed with 1 tablespoon of vinegar. The texture may be slightly different but still delicious.