 Save It
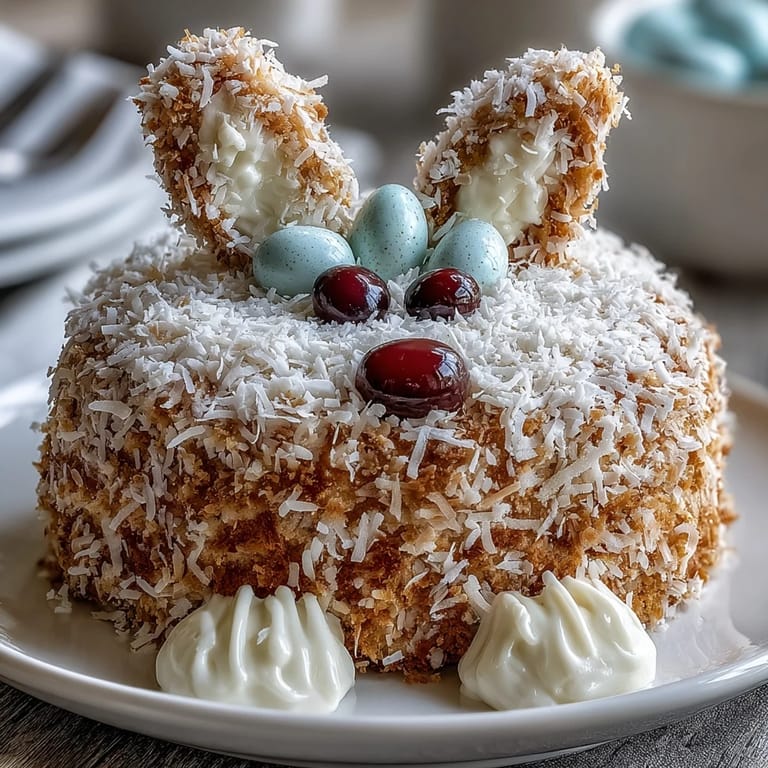
 There's something magical about springtime celebrations, and nothing captures that spirit quite like an Easter Bunny Cake adorned with fluffy coconut fur and a playful jelly bean tail. This whimsical dessert transforms simple cake rounds into an adorable bunny that will delight guests of all ages. With its soft vanilla cake, creamy buttercream frosting, and charming coconut coating, this festive creation is as delicious as it is delightful. Whether you're hosting an Easter brunch, a spring birthday party, or simply want to bring smiles to your table, this bunny cake is the perfect centerpiece that combines creativity with homemade goodness.
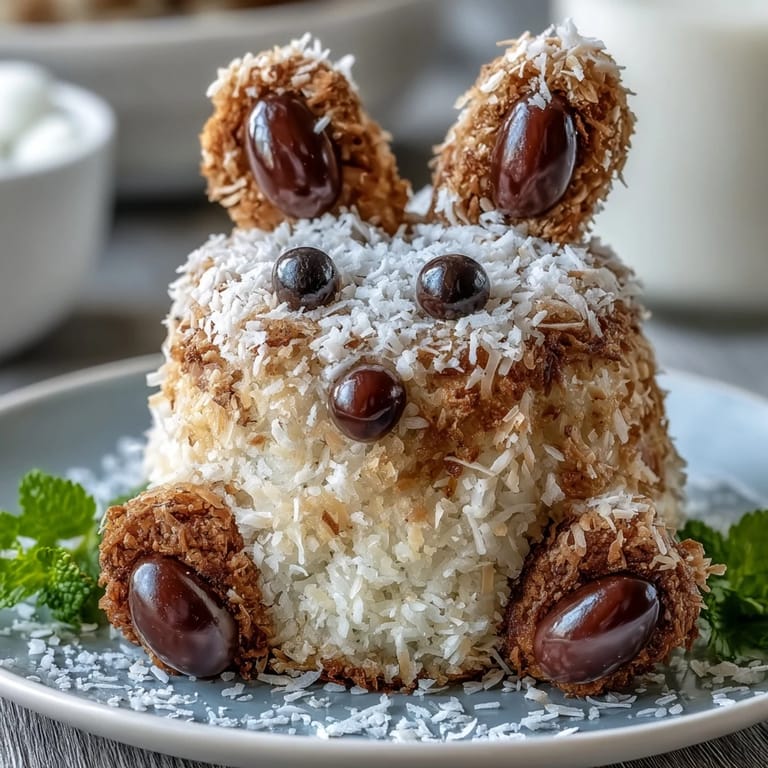
Save It The beauty of this Easter Bunny Cake lies in its clever construction. By cutting and arranging two round cakes, you'll create an instantly recognizable bunny shape without the need for specialty pans. The shredded coconut pressed into the frosting mimics soft bunny fur beautifully, while colorful jelly beans add charming details like a fluffy tail and tiny paw pads. The result is a show-stopping dessert that looks professionally decorated but is achievable for home bakers of medium skill level. Best of all, the cake itself is wonderfully moist and flavorful, ensuring it tastes just as good as it looks.
Ingredients
Tired of Takeout? 🥡
Get 10 meals you can make faster than delivery arrives. Seriously.
One email. No spam. Unsubscribe anytime.
- Cake: 2 1/2 cups (315 g) all-purpose flour, 2 1/2 tsp baking powder, 1/2 tsp baking soda, 1/2 tsp salt, 1 cup (225 g) unsalted butter (softened), 1 3/4 cups (350 g) granulated sugar, 4 large eggs (room temperature), 1 tbsp vanilla extract, 1 cup (240 ml) whole milk
- Frosting: 1 cup (225 g) unsalted butter (softened), 4 cups (480 g) powdered sugar (sifted), 2 tsp vanilla extract, 2–4 tbsp (30–60 ml) milk
- Decorations: 2 cups (160 g) sweetened shredded coconut, 1 large pink jelly bean (for tail), 4 large white jelly beans (for paws), 4 small pink jelly beans (for paw pads), pink food coloring (optional, for ear details), 2 mini chocolate chips or black jelly beans (for eyes)
Instructions
- Step 1: Prepare the Pans
- Preheat the oven to 350°F (175°C). Grease and flour two 8-inch (20 cm) round cake pans.
- Step 2: Mix the Dry Ingredients
- In a medium bowl, whisk together flour, baking powder, baking soda, and salt.
- Step 3: Cream Butter and Sugar
- In a large bowl, cream butter and sugar until light and fluffy. Beat in eggs, one at a time, then add vanilla.
- Step 4: Combine Wet and Dry
- Alternately add the flour mixture and milk to the butter mixture, beginning and ending with flour. Mix until just combined.
- Step 5: Bake the Cakes
- Divide the batter evenly between the pans. Bake for 30–35 minutes, or until a toothpick inserted in the center comes out clean.
- Step 6: Cool Completely
- Cool cakes in pans for 10 minutes, then transfer to a wire rack to cool completely.
- Step 7: Make the Frosting
- Prepare the frosting: Beat butter until creamy. Gradually add powdered sugar, then vanilla and enough milk to reach a spreadable consistency.
- Step 8: Shape the Bunny Body
- Cut one cake round in half to create two semicircles. Place the whole cake round on a serving platter to form the bunny's body. Attach the semicircles to one end, standing upright, to make the bunny's back and head.
- Step 9: Cut and Attach Ears and Paws
- From the second cake, cut out two ear shapes and two paw shapes using a knife. Attach the ears and paws to the bunny body using frosting.
- Step 10: Frost the Cake
- Frost the entire cake generously.
- Step 11: Apply Coconut Fur
- Press shredded coconut over the frosted cake to resemble bunny fur.
- Step 12: Add Decorative Details
- Use the pink jelly bean for the tail; place white and pink jelly beans on the paws for pads. Add mini chocolate chips or black jelly beans for eyes. Tint some coconut pink with food coloring for ear detail, if desired.
- Step 13: Chill and Serve
- Chill until ready to serve.
Zusatztipps für die Zubereitung
To ensure your Easter Bunny Cake turns out perfectly, make sure all your ingredients are at room temperature before you begin, especially the eggs and butter. This helps create a smoother batter and more even texture. When cutting the cake shapes for the ears and paws, work slowly with a sharp serrated knife and consider sketching the shapes on parchment paper first as a guide. If the cake crumbles slightly during cutting, don't worry—the frosting and coconut will cover any imperfections. For the fluffiest coconut fur, gently fluff the shredded coconut with your fingers before pressing it onto the frosted cake. When attaching cake pieces with frosting, use toothpicks for extra stability if needed, just remember to remove them before serving.
Varianten und Anpassungen
This versatile recipe welcomes many creative adaptations. For extra flavor, add lemon or almond extract to the cake batter for a refreshing twist. If you're short on time, use store-bought cake mix and frosting for a quicker version that still delivers impressive results. Those with dietary restrictions can substitute gluten-free flour for a gluten-free cake, ensuring everyone can enjoy this festive treat. You can also customize the color scheme by tinting the coconut different pastel shades or using different colored jelly beans to match your party theme. For a chocolate version, replace half the all-purpose flour with cocoa powder and use chocolate frosting instead of vanilla.
Serviervorschläge
This Easter Bunny Cake shines as the centerpiece of any spring celebration table. Present it on a large platter surrounded by colorful Easter eggs, fresh spring flowers, or pastel candies for an extra festive display. Pair each slice with a glass of cold milk for children or herbal tea for adults. The cake is sweet and rich, so consider serving it alongside fresh berries or a light fruit salad to balance the flavors. It's perfect for Easter brunch, afternoon tea parties, spring birthdays, or baby showers. Cut generous slices and watch as guests of all ages delight in this charming creation.
 Save It
 Creating this Easter Bunny Cake is more than just baking—it's about bringing joy and whimsy to your celebration. The process of transforming simple round cakes into an adorable bunny is incredibly rewarding, and the smiles it brings to your table make every minute worthwhile. Whether this becomes your new Easter tradition or a special springtime surprise, this charming cake proves that homemade creations crafted with love always taste better. So gather your ingredients, embrace your creativity, and get ready to create a dessert that's as memorable as it is delicious. Your Easter celebration deserves this extra-special sweet centerpiece.
Common Questions About Recipes
- → How do you achieve the fluffy coconut texture?
After frosting the cake, press sweetened shredded coconut evenly over the surface to mimic a soft, furry texture.
- → What is the best way to assemble the bunny shape?
Use one whole cake round for the body and cut the other into semicircles for the back and head. Attach with frosting, then add the ears and paws cut from the remaining cake pieces.
- → Can I add color to the coconut fur?
Yes, a few drops of pink food coloring gently mixed with shredded coconut add delicate ear details for a whimsical touch.
- → What substitutes work for jelly beans in decorations?
Mini chocolate chips or small candies can replace jelly beans for eyes and paw pads if preferred.
- → How can I adjust this for dietary needs?
Swap all-purpose flour with gluten-free flour and ensure frosting ingredients meet dietary preferences to accommodate restrictions.