 Save It
 My neighbor brought a batch of these to a dinner party last spring, and I watched them disappear faster than any other dish on the table. She wouldn't share her method at first, but after some friendly persistence, she admitted the trick was all in the panko-to-cheese ratio and not skipping that halfway turn in the oven. Now they're my go-to when I need something that feels fancy but comes together in under an hour.
I made these for my daughter's school potluck, and she actually asked me to make them again the following week because her friends kept texting her asking what that amazing crispy thing was. Watching her face light up when people complimented something she helped me prepare felt better than any dinner party success story.
Ingredients
- Fresh asparagus spears: Medium thickness works best because thin spears can dry out while thick ones might not cook through evenly, so aim for that sweet spot where they're sturdy enough to handle breading but not woody.
- All-purpose flour: This light coating helps the egg wash grip the panko, creating that crucial barrier between the wet interior and the hot oil on the baking sheet.
- Large egg and milk: Whisking them together creates a smooth batter that sticks to every surface without pooling, which is the difference between patchy breading and full coverage.
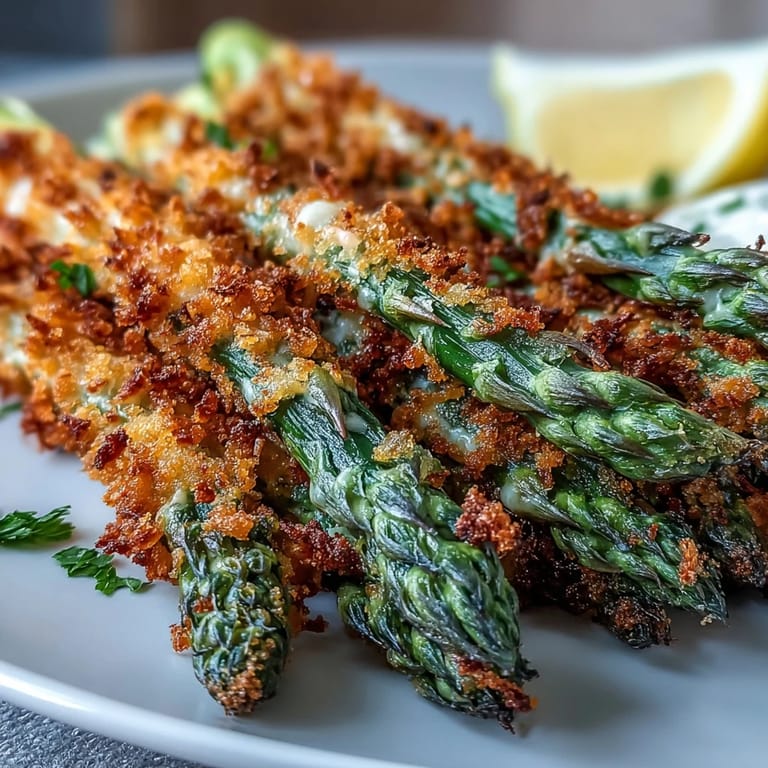
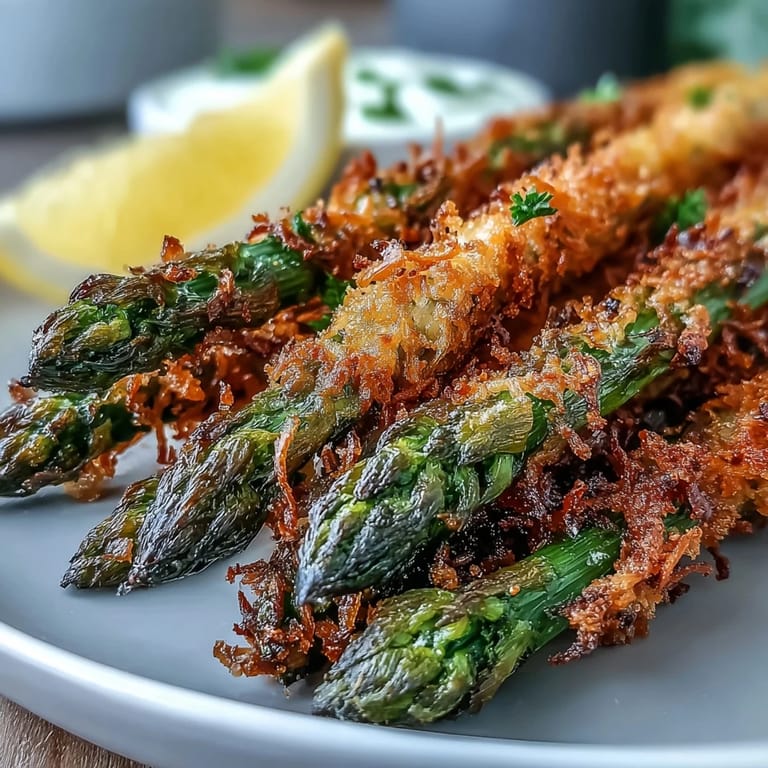
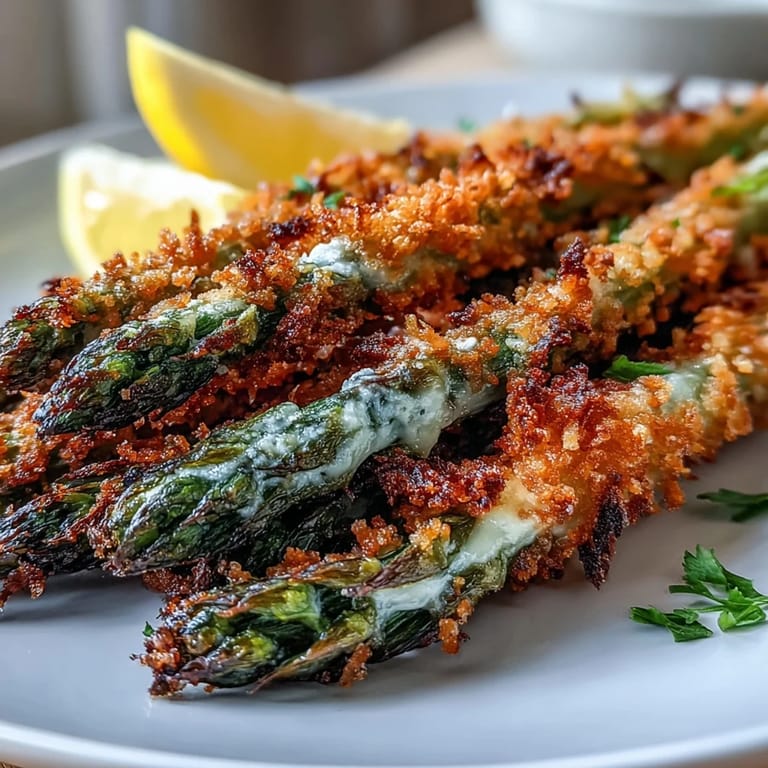
- Panko breadcrumbs: These Japanese-style crumbs have larger air pockets than regular breadcrumbs, which means they crisp up faster and stay crunchy even as the asparagus steams from inside.
- Asiago cheese: Finely grated Asiago brings a sharper, more complex flavor than Parmesan alone, and it browns beautifully when the spears hit the heat.
- Smoked paprika: Just a half teaspoon adds a whisper of smokiness that makes people pause and wonder what that subtle flavor is in the background.
- Garlic powder and onion powder: These seasonings distribute evenly through the coating in a way fresh versions can't, ensuring every bite tastes seasoned rather than just the outside layer.
- Olive oil: This gets brushed onto the baking sheet and the spears, and it's the real hero that turns panko into actual crispy armor instead of pale and soft.
Tired of Takeout? 🥡
Get 10 meals you can make faster than delivery arrives. Seriously.
One email. No spam. Unsubscribe anytime.
Instructions
- Heat your oven and prep your stage:
- Set the oven to 425°F and line your baking sheet with parchment paper, then drizzle a tablespoon of olive oil across it or spray lightly. This oiled surface is where the magic happens, so don't skip it thinking the spears will cook fine without it.
- Prepare and dry your asparagus:
- Rinse the spears under cold water and pat them completely dry with paper towels, because any moisture clinging to them will create steam instead of crispiness. Snap or trim off the woody ends by bending each spear until it naturally breaks at the point where it wants to.
- Set up your breading station:
- Arrange three shallow bowls in a line: flour in the first, whisked egg and milk in the second, and your mixed panko-Asiago coating in the third. This assembly line approach keeps things clean and prevents your coating mixture from getting soggy partway through.
- Bread the asparagus with intention:
- Working with just a few spears at a time, roll each one in flour, tap off the excess, dip it into the egg wash until fully coated, then press it firmly into the panko mixture, turning to make sure all sides get that golden armor. The gentle pressing is key because it helps the crumbs stick rather than just dusting off in the oven.
- Arrange on your baking sheet:
- Place each breaded spear on the oiled parchment paper with a little space between them so hot air can circulate and crisp them all over. Crowding them together creates steam pockets that will soften the coating.
- Oil for maximum crispiness:
- Drizzle the remaining tablespoon of olive oil over the spears or give them a light spray of cooking oil, then gently turn each one to ensure all sides are lightly oiled. This is what transforms the panko from merely coated to genuinely crispy.
- Bake with a strategic flip:
- Place the sheet on the middle rack and bake for about five minutes, then turn each spear carefully with tongs and bake for another five to nine minutes depending on thickness. The turning ensures even browning and prevents the bottoms from getting too dark while the tops stay pale.
- Check for golden crispiness:
- The spears are done when the coating is deeply golden and sounds crispy when you tap it, and the asparagus is tender when you pierce it with a fork. If you want that extra-dark, shatteringly crisp finish, turn on the broiler for one to two minutes at the very end, but watch them like a hawk because they go from golden to burned in about forty-five seconds.
- Finish and serve while hot:
- Immediately sprinkle the reserved Asiago cheese over the hot spears so it melts slightly into the warm coating, then add a light pinch of salt if needed and any fresh herbs or red pepper flakes you like. Serve them right away with lemon wedges and whatever dipping sauce calls to you.
 Save It
 There's something about watching someone take that first bite of crispy asparagus and seeing their expression shift from polite interest to genuine surprise that never gets old. It's such a simple dish, but it somehow manages to feel like you've done something more thoughtful than you actually have.
Why Thickness Matters More Than You'd Think
Thin asparagus spears will cook through in eight to ten minutes and might actually dry out by the time the coating browns, so if your market is only selling those pencil-thin ones, you'll need to watch the clock more carefully and pull them at the first sign of golden color. Thick spears, on the other hand, need the full twelve to fourteen minutes to become tender inside while building that crispy exterior, and they have enough substance to hold up to aggressive breading and flipping. Medium spears are the Goldilocks option, taking about ten to twelve minutes and behaving predictably enough that you can turn your attention to other things for a moment without worrying you'll have rubbery or undercooked vegetables on your hands.
The Asiago and Cheese Layer Secret
Asiago is sharper and more complex than straight Parmesan, and when it hits the hot panko coating, it browns in a way that adds visual appeal and an almost caramelized depth that plain cheese can't match. The optional Parmesan works as a supporting player, adding a bit more umami without overpowering the Asiago's personality. If you want to get fancy, you can add a teaspoon of finely grated lemon zest to the breadcrumb mixture before you start breading, which adds a bright note that plays beautifully with the cheese and makes people wonder what that citrusy hint is lurking in the background.
Make-Ahead Magic and Last-Minute Saves
You can bread the asparagus spears up to four hours ahead of time and refrigerate them on a plate covered loosely with plastic wrap, which is a lifesaver when you're planning a dinner party and want to minimize last-minute chaos. This actually helps because the coating sets slightly and adheres better, meaning you're less likely to have breading slide off during the flip. For an even faster weeknight version, try the air fryer method at 390°F for seven to ten minutes with a halfway shake, which cuts the cooking time roughly in half and still delivers that crispy texture without the need for as much oil.
- If you're short on time, skip the fresh herbs and just use the Asiago cheese finish, which is honestly delicious enough on its own.
- Lemon wedges are really the only serving essential, though any good aioli or lemon-garlic yogurt dip will make people think you've gone to way more trouble than you actually have.
- These taste best served immediately while the coating is still crackling, so don't make them hours ahead and expect them to stay crispy.
 Save It
 These spears somehow manage to be elegant enough for a dinner party but simple enough that you can make them on a random Tuesday when you want something a little special for yourself. That sweet spot where cooking feels less like a chore and more like a small act of kindness is exactly where this recipe lives.
Common Questions About Recipes
- → What thickness of asparagus works best?
Medium to thick asparagus spears hold up best during the breading and baking process. Thicker spears provide a better ratio of tender interior to crispy coating and won't become mushy. Adjust baking time accordingly: 8-10 minutes for thin, 10-12 for medium, and 12-14 for thick spears.
- → Can I prepare these ahead of time?
Yes, you can coat the asparagus spears up to 4 hours ahead and refrigerate them on the baking sheet. Keep them covered until ready to bake. This makes them perfect for entertaining. Simply bake just before serving for optimal crispiness.
- → How do I ensure maximum crispiness?
Use panko breadcrumbs rather than regular breadcrumbs for the crunchiest texture. Make sure to drizzle or spray the coated spears with oil on all sides before baking. Don't overcrowd the baking sheet, and turn them halfway through baking. For extra golden color, broil for 1-2 minutes at the end.
- → Can I use an air fryer instead of the oven?
Absolutely! Air frying is a great alternative. Cook the breaded spears at 390°F (200°C) for 7-10 minutes, turning them halfway through. The air fryer may produce an even crispier result with less oil needed.
- → What dipping sauces pair well with these?
These spears are delicious with aioli, lemon-garlic yogurt sauce, or marinara. The tangy brightness of lemon-based sauces complements the rich Asiago coating beautifully. Ranch dressing, romesco sauce, or even a simple garlic butter also work wonderfully.
- → Can I make this gluten-free or dairy-free?
Yes, substitute gluten-free all-purpose flour and gluten-free panko breadcrumbs for a gluten-free version. For dairy-free, use dairy-free cheese alternatives in place of Asiago and Parmesan. The coating will still be crispy and flavorful with these substitutions.