 Save It
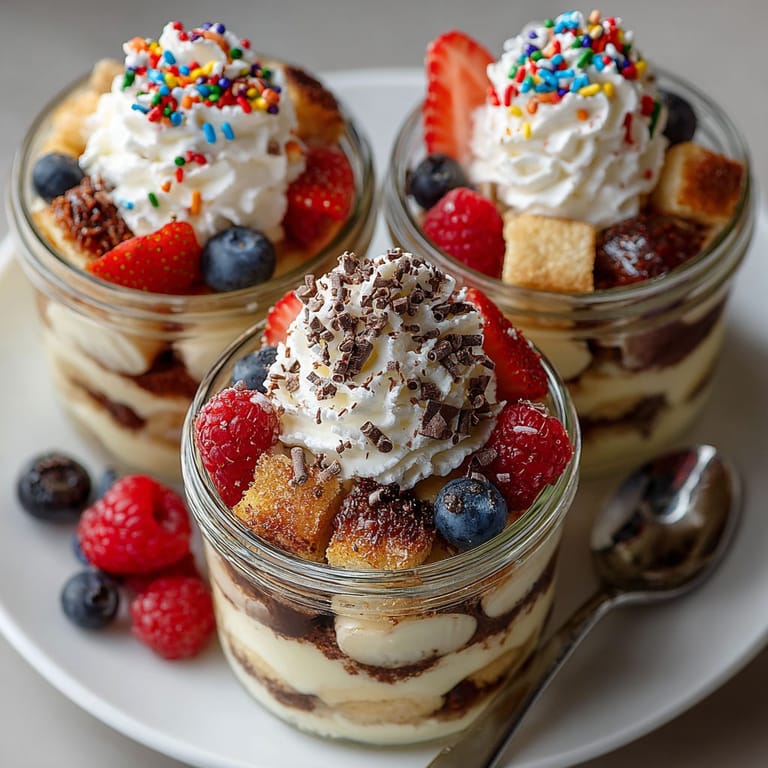
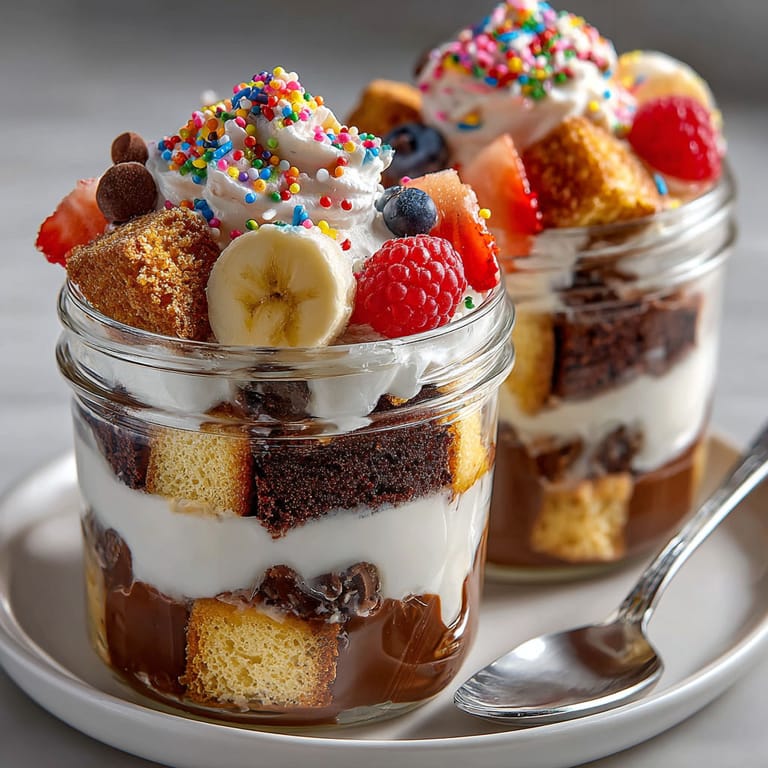
 Turn any casual gathering into a celebration with these chaos cake trifle jars. Bursting with colorful cake pieces, creamy pudding, juicy fruit, and billowy whipped cream in every spoonful, this dessert brings out the inner kid in everyone and makes the most of cake scraps or store-bought slices. Each jar is playful and totally customizable so no two jars are exactly alike.
The first time I made these was for a spontaneous backyard picnic. I grabbed some leftover cupcakes, tossed in fruit and pudding, and quickly became the family dessert hero. Now everyone requests their own chaos jar for birthday parties and sleepovers.
Ingredients
- Assorted cake cubes: Choose a mix of flavors like chocolate, vanilla, or red velvet for both color and variety. Stale cake works great too
- Prepared vanilla pudding: Opt for homemade or store bought. If you have a favorite pudding flavor, swap it in
- Mixed berries: Strawberries, blueberries, raspberries all bring different pops of flavor and color. Make sure to pick ripe berries and chop larger ones into bite sized pieces
- Banana: Sliced fresh banana adds sweetness and a soft creamy layer. Use a just ripe banana to avoid mushiness
- Heavy cream: Whipped to soft fluffy peaks forms a dreamy backdrop. Try to use cold heavy cream for best results
- Powdered sugar: Sweetens the whipped cream without graininess. Look for fine confectioners sugar
- Vanilla extract: Rounds out the whipped cream flavor. A pure vanilla extract will make a difference
- Chocolate chips or candy pieces: These add crunchy surprises in every bite. Go with your favorites or what you have on hand
- Rainbow sprinkles: Essential for a festive finish. Choose jimmies or nonpareils for extra color
Tired of Takeout? 🥡
Get 10 meals you can make faster than delivery arrives. Seriously.
One email. No spam. Unsubscribe anytime.
Instructions
- Prepare the Whipped Cream:
- In a chilled mixing bowl, beat the heavy cream with powdered sugar and vanilla extract using an electric mixer on medium speed. Continue until stiff peaks form, this can take about five minutes. Be careful not to overbeat or it will become grainy. Set aside in the fridge
- Build the First Layer:
- Add a generous layer of assorted cake cubes to the bottom of each glass jar. Press the cake lightly to ensure it covers the base evenly
- Add a Pudding Layer:
- Spoon a layer of prepared vanilla pudding over the cake. Use the back of your spoon to spread it so it fully covers the cake
- Layer in the Fruit:
- Add a selection of mixed berries and a few banana slices over the pudding layer. Distribute evenly for a nice mix of flavors in every bite
- Top with Whipped Cream:
- Dollop a fluffy scoop of whipped cream on top of the fruit layer. Spread gently to cover
- Add Extras:
- Scatter chocolate chips or candy pieces across the whipped cream if you want an extra treat
- Repeat Layers:
- Continue layering cake, pudding, fruit, and whipped cream until the jar is full. Finish with whipped cream at the very top
- Decorate and Chill:
- Sprinkle on rainbow sprinkles for extra color and fun. Cover the jars and refrigerate up to four hours to let flavors meld or serve immediately
 Save It
 My personal favorite is using red velvet cake since it stands out in every layer and adds a subtle cocoa punch. My family loves assembling these together, especially when there is a competition for the most colorful jar.
Storage tips
If not eating right away, cover jars tightly and keep them in the fridge, they stay fresh for up to two days. The cake will soften slightly and the flavors will mingle for an even more delicious treat. Just avoid keeping them too long with banana slices, which can brown quickly.
Ingredient substitutions
Swap pudding for Greek yogurt for a lighter version or try chocolate mousse for chocolate lovers. If you cannot find mixed berries, chopped mango or peaches are a fun summer option. Use gluten free cake and dairy free whipped topping and pudding to make the jars allergy friendly.
Serving suggestions
Perfect for picnics, birthday parties, or potlucks—let everyone layer their own jars for a hands on dessert bar. Pair with hot coffee, cold milk, or a sparkling dessert wine for grownup gatherings.
Cultural and historical context
Trifle is a traditional English dessert made with sponge cake, custard, fruit, and whipped cream. This chaos cake version puts an American spin on the classic, swapping custard for pudding and layering in beloved grocery store cakes and candies for a whimsical twist.
Seasonal Adaptations
Use ripe peaches and blackberries in summer. Try apples, pears, and cinnamon in fall. Add peppermint chips and crushed gingerbread in winter.
Success Stories
One summer afternoon my niece made a trifle jar with only rainbow sprinkle cake, extra banana, and every candy she could find. It was a wild combo but she declared it her masterpiece and now it is a family tradition to invent new versions.
Freezer Meal Conversion
Trifle jars are best fresh but you can freeze cake cubes and even whipped cream separately in advance. Let everything thaw and assemble just before serving for effortless entertaining.
Save It No matter how you assemble your chaos cake trifle jars, expect smiles and sticky fingers. They are equal parts nostalgia, fun, and sweet indulgence.
Common Questions About Recipes
- → Can I use different cake flavors?
Yes, feel free to use any cake variety you like, including chocolate, vanilla, or even marble. Mixing flavors adds extra appeal.
- → What fruits work best for layering?
Mixed berries and bananas are popular, but you can add peaches, kiwis, or mango for a twist. Use fresh fruits for best texture.
- → How long can the jars be stored?
Keep filled jars refrigerated for up to 4 hours. For best texture, assemble shortly before serving, especially if using soft fruits.
- → Can I substitute the pudding?
Yes, Greek yogurt or mascarpone are lighter options. Choose your favorite pudding flavor for additional variety.
- → Are there nut-free options?
Absolutely. Skip nuts or candies that may contain allergens and check all ingredients to ensure they are nut-free as needed.
- → What tools are required for assembly?
You'll need an electric mixer or whisk for whipping cream, small glass jars, mixing bowls, and spoons for layering.