 Save It
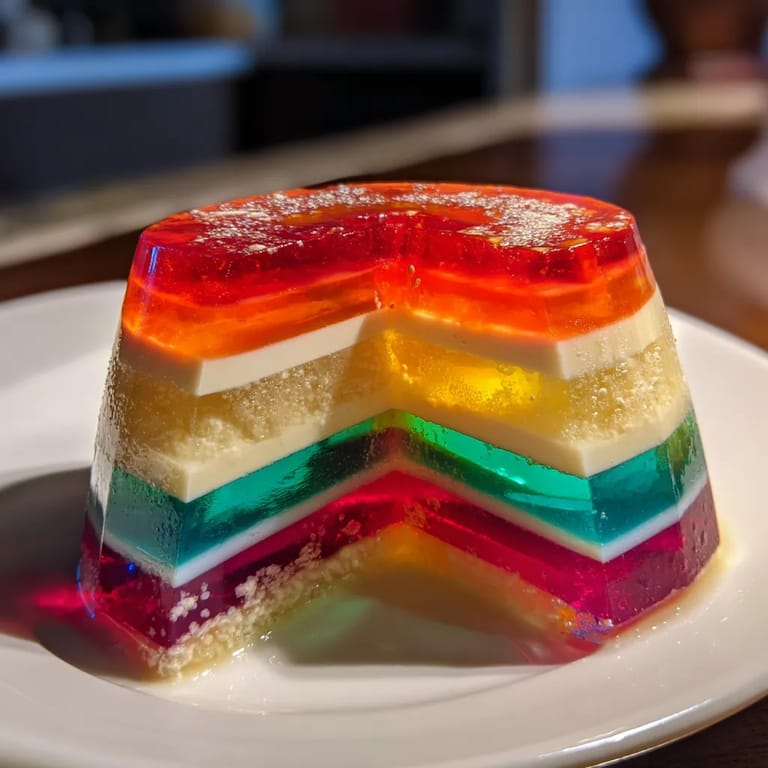
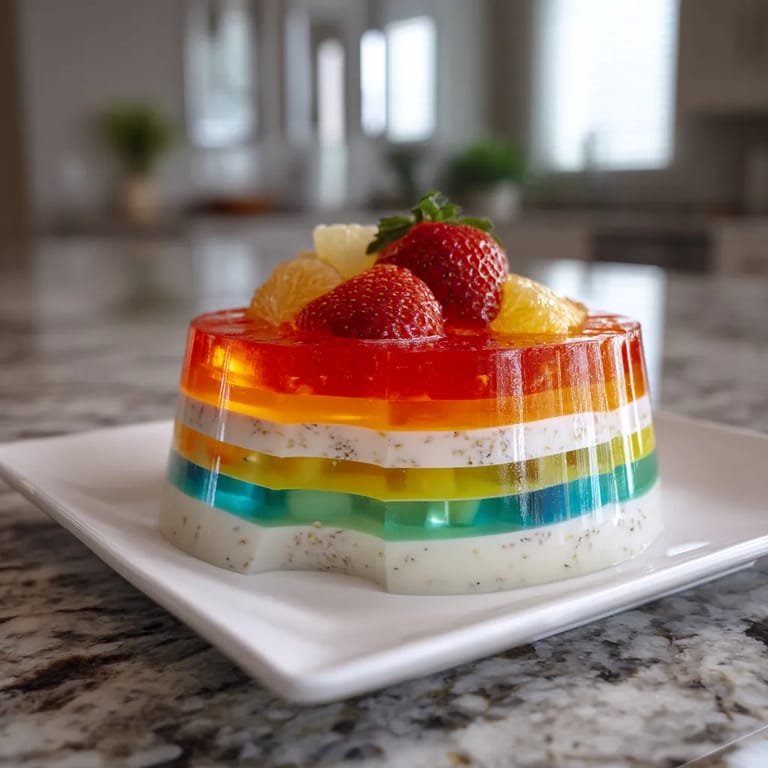
 This vibrant Rainbow Fruit Jello Mold transforms ordinary gelatin into a stunning, jewel-toned dessert that brings nostalgic joy to any gathering. The alternating layers of bright jello and creamy white create a showstopper that tastes as delightful as it looks.
I first made this rainbow jello mold for my daughter's birthday party when I needed something colorful that could be prepared in advance. The children were mesmerized by the "rainbow cake" and now it's requested at nearly every family celebration.
Ingredients
- 5 boxes flavored gelatin in rainbow colors: These create your vibrant layers and each brings its own distinct flavor profile. Choose quality brands for the best color intensity.
- 5 cups boiling water: The heat activates the gelatin crystals for proper dissolution. Use freshly boiled water for best results.
- 1 can sweetened condensed milk: Creates the creamy white layers that make the colors pop. The sweetness balances the tart fruit flavors perfectly.
- 2 packets unflavored gelatin: Provides structure to the cream layers without adding competing flavors. Look for premium brands that dissolve completely.
- 1½ cups water (half boiling, half cold): The temperature combination ensures proper gelatin activation and prevents lumps.
- 1 cup finely chopped fresh fruit: Adds texture contrast and fresh flavor bursts. Select firm fruits that hold their shape when suspended.
Tired of Takeout? 🥡
Get 10 meals you can make faster than delivery arrives. Seriously.
One email. No spam. Unsubscribe anytime.
Step-by-Step Instructions
- Prepare Your Mold:
- Lightly grease your bundt pan or silicone mold with a neutral oil. Be thorough but avoid pooling oil which can create blotches in your first layer. A silicone pastry brush helps reach all the nooks and crannies for even coverage.
- Create Your First Color Layer:
- Dissolve one packet of flavored gelatin in exactly 1 cup of boiling water, stirring continuously for a full minute until no crystals remain. Allow it to cool until just warm to the touch (approximately 10 minutes). This cooling prevents melting subsequent layers while still allowing it to pour smoothly.
- Set The Foundation:
- Pour this first cooled jello mixture into your prepared mold creating a thin even layer. Transfer to the refrigerator and chill for 20 to 30 minutes until the layer feels tacky and set to the touch but not completely firm. The perfect timing here is crucial for layer adhesion.
- Prepare Optional Cream Layer:
- While your first layer sets combine unflavored gelatin with cold water in a bowl allowing it to bloom for 5 full minutes until it resembles applesauce. Add boiling water stirring vigorously then introduce the sweetened condensed milk. Stir until completely homogeneous and allow to cool to room temperature.
- Build Your Second Layer:
- Pour approximately ½ cup of the cream mixture over your set jello layer using the back of a spoon to gently distribute it along the edges first to prevent tunneling through the jello. Return to refrigerator for 20 minutes until just set.
- Complete The Rainbow:
- Repeat the jello and cream layer process with each color starting with red at the bottom progressing through orange yellow green and blue allowing 20 minutes set time between each addition. This patient layering creates the clean color separation that makes this dessert special.
- Final Setting:
- After adding your final layer refrigerate the entire mold for at least 2 hours or preferably overnight to ensure it's completely set throughout for the cleanest slices.
- Unmold With Confidence:
- Dip the mold briefly in warm water for 10 to 15 seconds to loosen the edges then quickly invert onto your serving plate. Give it a gentle shake and lift the mold away slowly to reveal your masterpiece.
 Save It
 You Must Know
This dessert reminds me of my grandmother's summer parties where she would unveil her famous rainbow jello to gasps of delight. She taught me to listen for the subtle sound of the gelatin releasing from the mold that perfect suction pop that signals success. The addition of fresh fruit was my own innovation that she later adopted calling my version an improvement on perfection.
Make Ahead Magic
This jello mold actually improves with time in the refrigerator. Make it up to 48 hours before serving for the most vibrant colors and firmest texture. The flavors meld beautifully while the structure maintains its integrity. Cover loosely with plastic wrap after it has completely set to prevent the surface from drying out or absorbing refrigerator odors.
Fruit Selection Wisdom
The success of your fruit additions depends entirely on choosing the right varieties. Berries like strawberries raspberries blueberries and blackberries work beautifully. Canned mandarin oranges drained well are perfect for orange layers. Avoid fresh pineapple kiwi and papaya as their enzymes prevent gelatin from setting properly. Always pat fresh fruit dry with paper towels before adding to prevent color bleeding and ensure pieces are small enough to stay suspended in the gelatin.
Save It Serving Suggestions
Elevate this dessert with accompaniments that complement its light fruity profile. A dollop of lightly sweetened whipped cream adds luxurious richness without overwhelming the delicate jello flavors. For elegant presentations garnish with fresh mint leaves and additional berries around the base. Serve slices on chilled plates for warm weather gatherings to maintain the dessert's refreshing quality longer.
Troubleshooting Tips
If your layers are bleeding together your previous layer wasn't set enough or your gelatin mixture was too warm. Always cool mixtures to room temperature before pouring.
When unmolding if the jello sticks try dipping in warm water for a few more seconds but avoid hot water which can melt the outer layer.
For sharper color definition use slightly less water in the colored layers making them more concentrated.
Common Questions About Recipes
- → Can I use sugar-free gelatin for this rainbow mold?
Yes, you can substitute sugar-free gelatin packets for a lower-calorie version. The setting properties work the same, though the flavor intensity might vary slightly. You may need to adjust chilling times as sugar-free varieties sometimes set more quickly.
- → Why did my layers mix together?
Layer mixing typically happens when the previous layer hasn't sufficiently set before adding the next one. Each layer should be cool and just set (slightly firm but still sticky to touch) before adding the next. Also, pour new layers gently over the back of a spoon to minimize disturbance.
- → How do I prevent my fruit from sinking to the bottom of each layer?
Let the gelatin cool until it reaches a syrupy consistency before adding fruit. The thicker texture will help suspend the fruit pieces. Using smaller fruit pieces and patting them dry before adding also helps prevent sinking. For heavier fruits, consider adding them when the layer is partially set.
- → Can I make this dessert ahead of time?
Yes, this dessert is perfect for making ahead! It can be prepared up to 2 days in advance and kept refrigerated. In fact, making it a day ahead allows the layers to set firmly, making it easier to unmold cleanly. Cover with plastic wrap after it's fully set to prevent the surface from drying out.
- → What's the best way to unmold the jello without breaking it?
For a clean release, dip the mold briefly (10-15 seconds) in warm—not hot—water, making sure no water gets inside. Place your serving plate on top and quickly flip it over. If it doesn't release immediately, gently shake or tap the mold. Silicone molds typically release more easily than metal bundt pans.
- → How can I create a dairy-free version of this dessert?
For dairy-free cream layers, substitute the sweetened condensed milk with a mixture of full-fat coconut milk (1 cup) and sugar (⅓ cup), reduced by simmering until slightly thickened. Alternatively, use store-bought dairy-free condensed milk alternatives made from coconut or oat milk.