 Save It
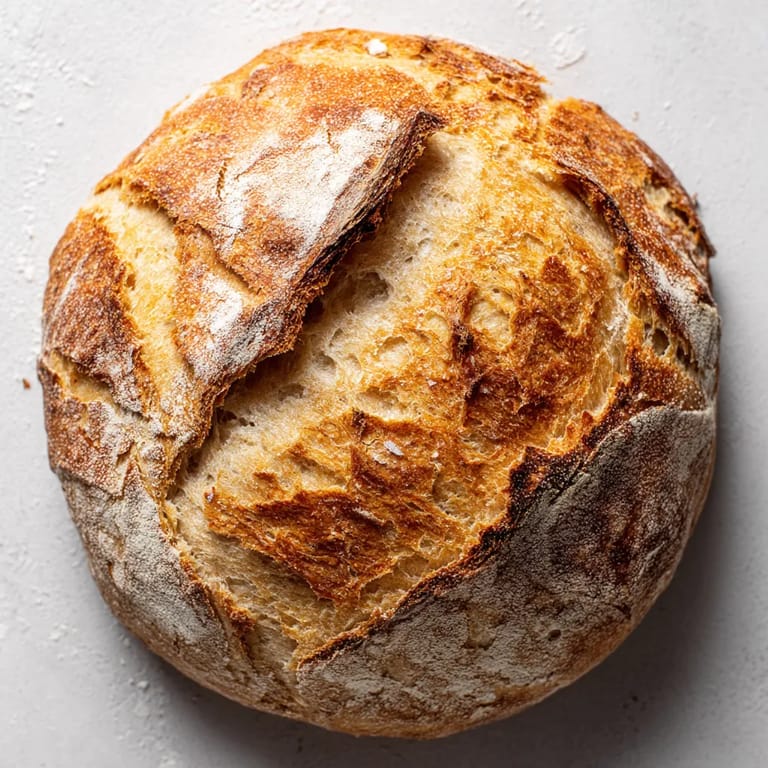
 This rustic no-knead buttermilk bread lets you enjoy homemade fresh bread without having to spend hours in the kitchen kneading. Its soft and tender crumb comes together almost effortlessly, perfect for anyone craving cozy bakery-style loaves at home.
The first time I made this bread was for a lazy Sunday brunch and now it has become my secret weapon when we want something homemade but fuss-free.
Ingredients
- All-purpose flour: Gives structure with a soft chewy bite. Use a good quality unbleached flour for best texture.
- Granulated sugar: Activates the yeast and adds subtle sweetness. Make sure it is fresh for reliable rising.
- Salt: Is essential to balance flavors and strengthen the dough. Choose fine sea salt for even mixing.
- Instant yeast: Ensures a reliable quick rise. Always check the expiration date for the best results.
- Buttermilk: Adds richness and just the right amount of tang. Use real cultured buttermilk for best flavor or a homemade substitute if needed.
- Unsalted butter: Melts into the dough making the crumb extra soft. Go with high-quality butter for the richest flavor.
Tired of Takeout? 🥡
Get 10 meals you can make faster than delivery arrives. Seriously.
One email. No spam. Unsubscribe anytime.
When I choose my ingredients I always opt for the freshest flour and real buttermilk. My bread always comes out with great flavor and texture.
Step-by-Step Instructions
- Combine Dry Ingredients:
- In a large mixing bowl vigorously whisk together the flour, sugar, salt, and instant yeast until everything is evenly distributed. This step is key so the yeast and salt never touch directly.
- Mix Wet Ingredients:
- Pour the buttermilk and melted butter into the dry mixture. Stir continuously with a sturdy wooden spoon or spatula, scraping the sides and bottom. The dough will look rough and shaggy at first, but keep mixing until no dry flour remains.
- First Rise:
- Cover the bowl tightly with plastic wrap or a clean kitchen towel. Set it someplace draft free and let it rise at room temperature for about two hours. The dough should double in size and become bubbly on top. This slow rise develops flavor and a soft texture.
- Preheat Oven and Dutch Oven:
- Once the dough has nearly completed its rise, set the oven to four hundred twenty five degrees Fahrenheit. If baking in a Dutch oven or heavy pot, place it inside to preheat so the bread gets an instant oven spring.
- Shape the Dough:
- Sprinkle flour on your hands and a sheet of parchment paper. Gently scrape out the dough and coax it into a round or oval loaf. Do not overwork it or you will lose all the lovely air bubbles.
- Transfer to Pot:
- With oven mitts, carefully remove your hot Dutch oven from the oven. Lift the dough using the parchment paper and settle it comfortably into the pot. The parchment helps avoid sticking and makes transfer easy.
- First Bake Covered:
- Place the lid on the pot and slide it back into the oven. Bake for thirty minutes covered. The steam trapped inside helps form a thin crisp crust.
- Finish Baking Uncovered:
- Remove the lid and bake another twelve to fifteen minutes. This step deepens the amber crust and ensures the interior bakes through. The bread is done when the crust is golden and it sounds hollow when tapped.
- Cool the Loaf:
- Use the parchment to lift the bread onto a wire rack. Wait until it has cooled completely to slice. This helps keep the crumb moist and prevents smashing the loaf.
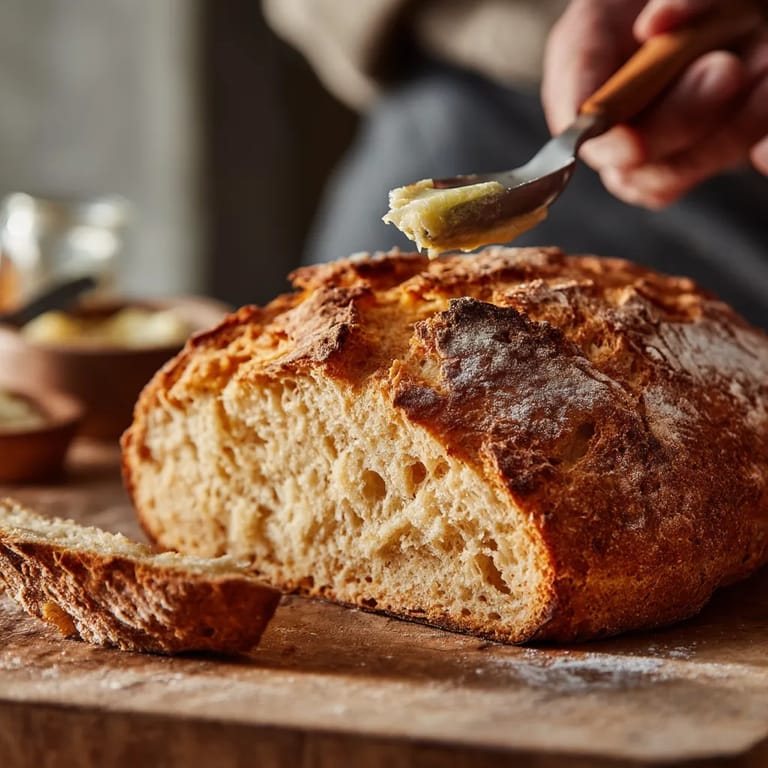 Save It
 Probably my favorite part of every loaf is the aroma from the hot Dutch oven and that first slice still warm. Smearing on butter with my kids hovering by is always a favorite memory.
Storage Tips
Once cooled, keep your loaf wrapped in a clean kitchen towel or sealed in a bread bag at room temperature for up to three days. For longer storage, slice and freeze the bread in a tightly sealed bag so you can enjoy a fresh piece anytime simply by toasting.
Ingredient Substitutions
If buttermilk is not in your fridge, you can make your own by mixing milk with a splash of lemon juice or vinegar and letting it sit for a few minutes. This works almost as well. You can swap in a bit of whole wheat flour for part of the all-purpose but expect a denser loaf.
Serving Suggestions
This bread is delicious sliced thick with jam for breakfast or as a base for hearty sandwiches. It is especially nice for dunking into soup or stew. My kids love it simply slathered with honey.
Baking Tradition
No-knead bread is a game changer for home bakers and has roots in simple farmhouse baking where time and simplicity matter most. The addition of buttermilk is an American touch that brings extra flavor and a bit of nostalgia to the table.
Save It Common Questions About Recipes
- → How long does the bread need to rise?
The dough should rise for about 2 hours at room temperature, or overnight in the refrigerator for extra flavor.
- → Can I substitute buttermilk?
Yes, use equal parts milk with 1 tablespoon of lemon juice or vinegar. Let stand 5 minutes before adding.
- → Do I need a Dutch oven to bake this bread?
While a Dutch oven is ideal for a crisp crust, any heavy, oven-safe pot with a lid can work.
- → How do I know when the bread is done baking?
The loaf should be golden and sound hollow when tapped. An internal temperature of 200°F is ideal.
- → What can I add for variation?
Try folding in chopped nuts, seeds, or dried fruit for extra texture and flavor in your loaf.
- → Is this bread suitable for vegetarians?
Yes, it’s vegetarian-friendly as it contains no meat, only dairy (buttermilk, butter), flour, yeast, sugar, and salt.