 Save It
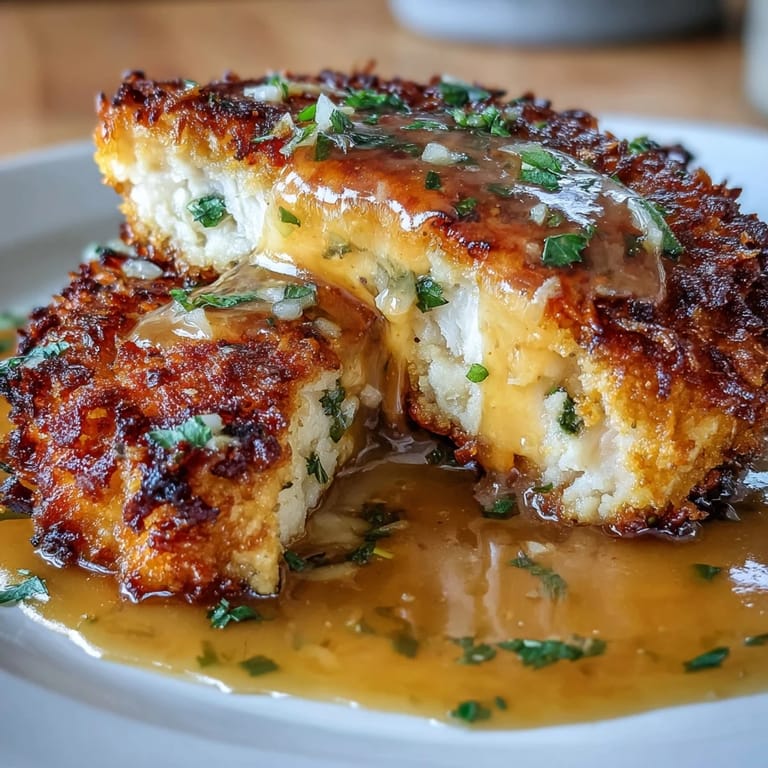
 There's something about the smell of butter meeting lemon that makes a kitchen feel like a restaurant, and that's exactly what drew me to this chicken dish years ago. I was standing in a friend's kitchen watching her work with such casual confidence, the way she'd pound those breasts thin and dredge them through egg and cheese like it was the easiest thing in the world. By the time that golden crust hit the pan, I was sold—no fancy techniques required, just crispy edges, bright acidity, and a sauce so buttery it made everything feel special. Now it's become my go-to when I want to impress without the stress.
I made this for my parents one Sunday evening when my mom mentioned she'd been craving something bright and lemony, and the look on her face when she tasted it told me everything I needed to know. My dad kept asking for more sauce, and somehow we ended up with crusty bread at the table to soak up every last drop. That meal became the thing they asked me to bring to family dinners, and it never disappointed.
Ingredients
- Chicken breast (1 1/2 lb, 2 large): Pounding these thin ensures they cook through quickly and evenly, plus you get more surface area for that glorious crust—patting them dry first is the secret to better browning.
- Parmesan cheese (1 cup grated): Freshly grated is non-negotiable here; pre-shredded cheese contains anti-caking agents that prevent a cohesive, crispy coating.
- All-purpose flour (3 tbsp): This helps bind the Parmesan and creates structure, turning the cheese into a proper crust rather than loose flakes.
- Eggs (2 large): Your binding agent—they help the coating stick and become golden brown, so don't skip whisking them properly.
- Garlic (3 cloves total): Some goes in the egg mixture for flavor depth, the rest blooms in the butter sauce for aromatic richness.
- Italian seasoning (1/2 tsp): A subtle backbone that prevents the dish from tasting one-note, though you can swap for dried oregano or basil if you prefer.
- Olive oil (1 tbsp): Just enough for a good sear—use a neutral oil with a high smoke point if you don't have good olive oil.
- Unsalted butter (8 tbsp): This becomes your sauce's soul; unsalted lets you control the seasoning and creates that silky, luxurious texture.
- Lemon juice (1/4 cup, about 2 lemons): Fresh is essential—bottled juice tastes sharp and one-dimensional compared to the brightness of real lemon.
- Chicken broth (1/4 cup): A small splash that balances the lemon and butter, preventing the sauce from becoming cloyingly rich.
- Fresh parsley (1 tbsp): A final flourish that adds color and a clean herb note, making the plate look intentional and alive.
Tired of Takeout? 🥡
Get 10 meals you can make faster than delivery arrives. Seriously.
One email. No spam. Unsubscribe anytime.
Instructions
- Butterfly and pound your chicken:
- Cut each breast in half lengthwise, then place between plastic wrap and pound gently to about 1/2 inch thickness—this is where patience pays off because even cooking starts here. You'll hear the gentle thud of the mallet and know you're building the foundation for something crispy.
- Create your egg bath:
- Whisk together eggs, minced garlic, Italian seasoning, salt, and pepper in a shallow bowl until well combined. This mixture should smell herbaceous and garlicky, your first hint of what's to come.
- Mix your crust:
- In another bowl, combine grated Parmesan and flour, stirring so the cheese and flour marry evenly. A quick taste (yes, raw flour is fine here) should taste sharp from the cheese with a subtle salty backbone.
- Coat each piece:
- Dip a chicken cutlet into the egg mixture, letting excess drip back into the bowl, then press it firmly into the Parmesan mixture so every surface gets covered. Work in batches and don't rush—a well-adhered coating is the difference between crispy and falling off.
- Pan-sear to golden:
- Heat olive oil in a large skillet over medium heat until it shimmers, then lay each cutlet flat in a single layer without crowding. Cook 4 to 5 minutes per side until the crust turns deep golden and an instant-read thermometer reads 165°F at the thickest part, then transfer to a warm plate.
- Build the lemon butter sauce:
- In a small saucepan over medium heat, melt butter and add minced garlic, stirring for about a minute until fragrant. Stir in lemon juice, chicken broth, and black pepper, then let it bubble gently for 2 minutes—the flavors will come together as one.
- Bring it together:
- Arrange warm chicken on a platter and spoon that glossy sauce over the top, turning each piece so it's coated in all that golden richness. Finish with lemon slices and parsley if you have them, then serve immediately while everything is still warm.
 Save It
 One evening I was cooking this for someone I was trying to impress, and the kitchen filled with this incredible aroma halfway through—that golden, lemony, buttery smell that made everything feel elegant. When they took that first bite and closed their eyes, I realized it wasn't the complexity that mattered, it was the confidence with which it came together.
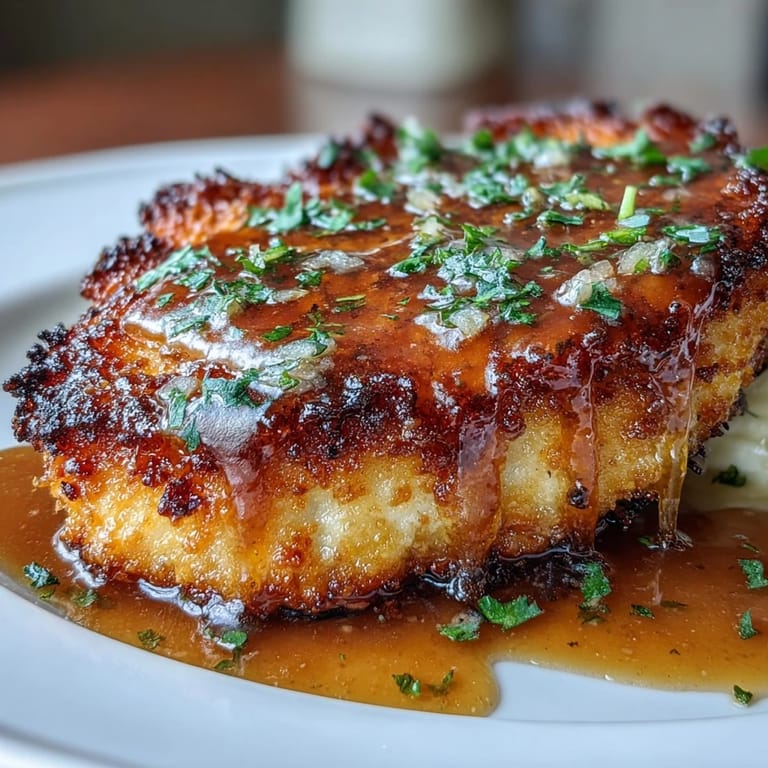
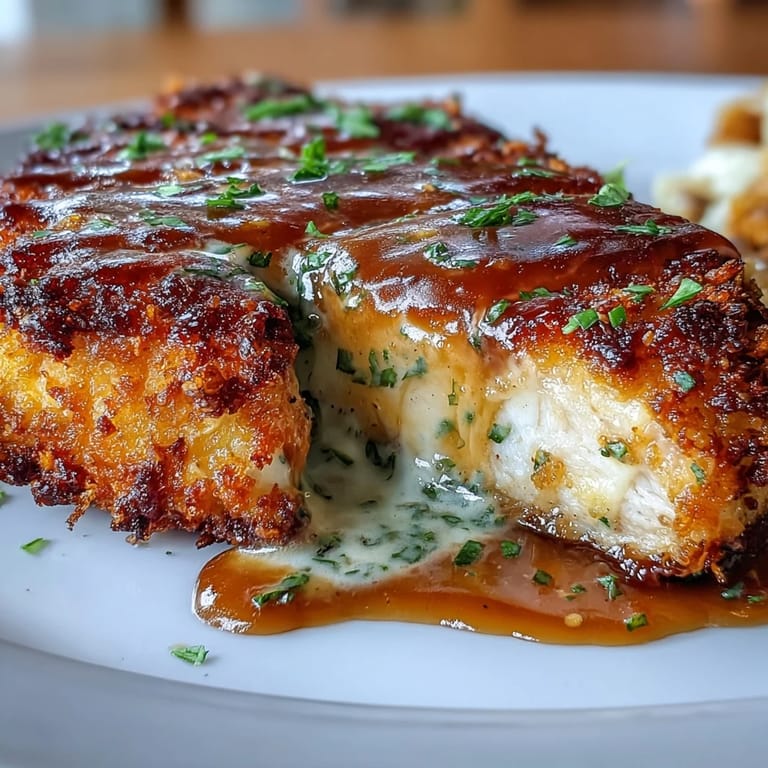
The Secret to a Crispy Crust
The magic happens when you let that Parmesan-flour mixture make actual contact with your pan—if the coating is loose or patchy, it won't develop that shattering crispness you're after. I learned this by rushing through the coating step once and ending up with sad, bare patches of chicken. Now I press firmly when dredging and let each cutlet sit on the parchment for a minute so the coating sets slightly before the pan, which makes all the difference.
Making the Sauce Silky and Rich
The lemon butter sauce is straightforward, but the order matters—you bloom the garlic in butter first to soften its bite, then add the acid at the end so it doesn't curdle the dairy. I've made the mistake of adding everything at once and ending up with a thin, broken sauce that looked unappetizing, but once I learned to build it in stages, it became glossy and coat-the-back-of-a-spoon luxurious. The brief simmer lets all the flavors find each other without overdoing it.
Serving and Pairing Ideas
This chicken shines alongside delicate carbs that can soak up that magnificent sauce—angel hair pasta is my first choice because it catches the butter in all its little nooks. I've also served it over roasted potatoes cut into thin planks, with a simple green salad dressed in nothing but olive oil and salt, or even alone with crusty bread for sauce-soaking. The key is leaving room on the plate for that sauce to shine.
- Pair with a crisp white wine like Pinot Grigio or Sauvignon Blanc to echo the lemon and cut through the richness.
- Add a pinch of red pepper flakes to the sauce if you want subtle heat without changing the dish's character.
- This reheats beautifully in a low oven (300°F) covered with foil, though the crust won't be quite as shattering as freshly made.
 Save It
 This is one of those dishes that proves you don't need hours in the kitchen to create something that tastes like you've been cooking all day. Serve it with confidence and watch how quickly the plate empties.
Common Questions About Recipes
- → How do I get the parmesan coating to stick properly?
Pat the chicken completely dry before dipping. Let excess egg mixture drip off, then press the parmesan-flour mixture firmly onto the cutlets. This ensures an even, adherent coating that won't fall off during cooking.
- → Can I make this ahead of time?
You can pound and coat the chicken up to 4 hours ahead, storing it covered in the refrigerator. The sauce can be made ahead and gently reheated. For best results, cook the chicken just before serving.
- → What sides pair well with this dish?
This chicken complements angel hair pasta, roasted potatoes, risotto, or a fresh green salad. The bright lemon flavor also pairs beautifully with steamed asparagus or sautéed spinach.
- → How do I know when the chicken is done?
The chicken is ready when it reaches an internal temperature of 165°F (74°C). The coating should be golden brown and crispy. If you don't have a thermometer, the meat should feel firm and the juices run clear.
- → Can I use chicken thighs instead of breasts?
Yes, boneless skinless chicken thighs work wonderfully. They may need slightly longer cooking time (5-6 minutes per side) due to their higher fat content. Pound them to even thickness for consistent cooking.
- → How can I make this gluten-free?
Substitute the all-purpose flour with a 1:1 gluten-free flour blend and ensure your chicken broth is certified gluten-free. The coating technique remains exactly the same.