 Save It
 My cousin called me three weeks before graduation asking if I could make her cake—not just any cake, but something that would make her friends actually remember the dessert table. I'd never attempted a two-tier before, and honestly, I was nervous about the whole stacking situation. But there was something in her voice that made me say yes, and that afternoon in my kitchen became one of those unexpected turning points where you realize baking is really just controlled optimism with butter.
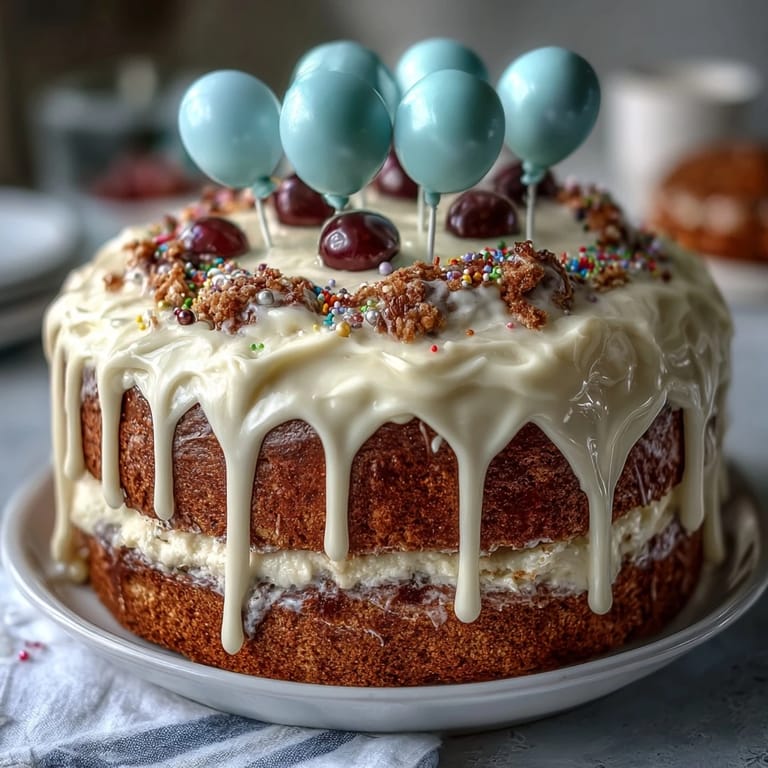
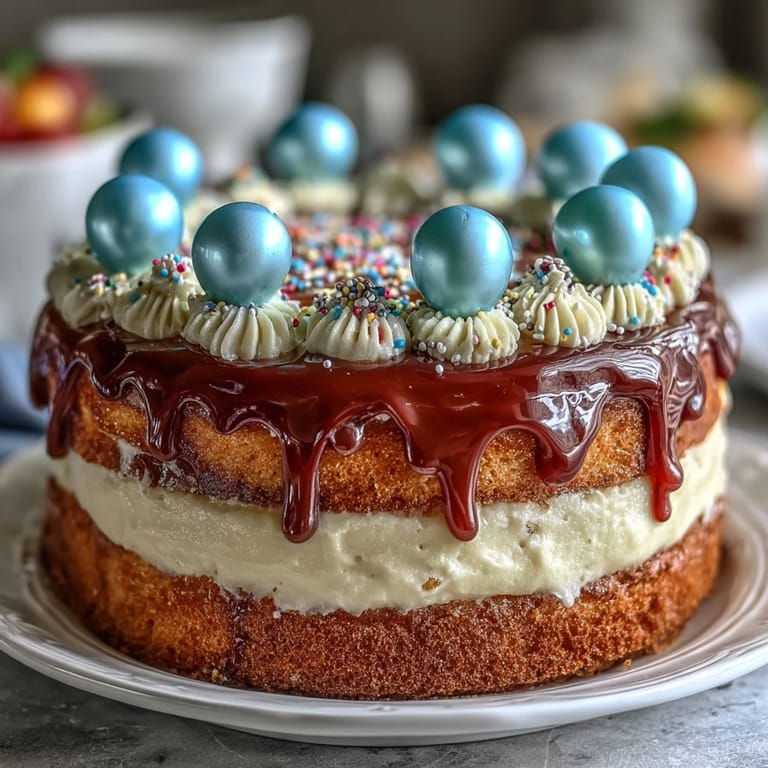
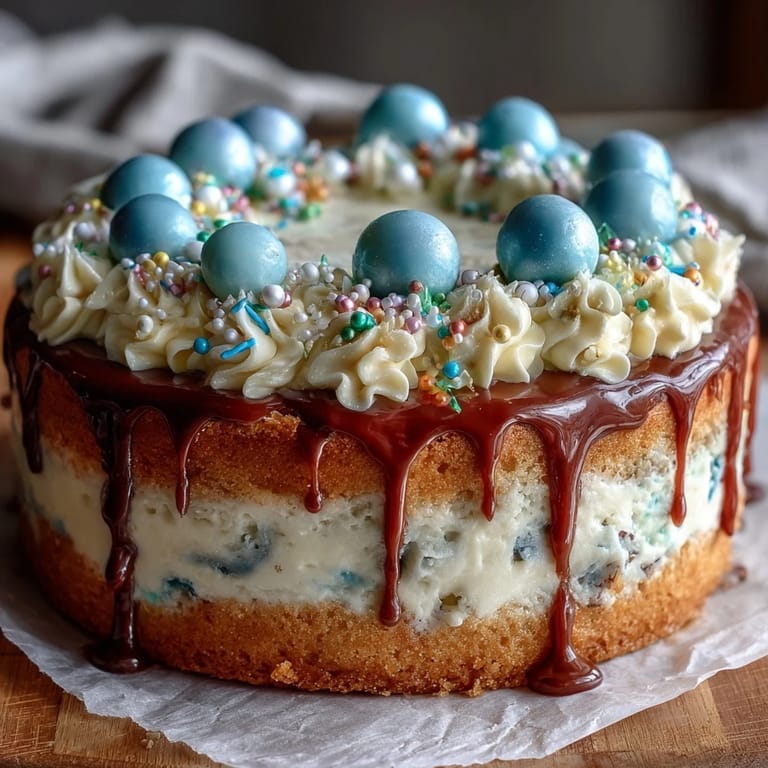
I'll never forget the moment we placed those balloon toppers on top—my cousin's mom gasped, and suddenly this cake became the centerpiece of the whole celebration. It wasn't just dessert anymore; it was the physical proof that we were all so proud of her. The kitchen had been chaos an hour before, but watching people slice into those layers and taste that buttery vanilla sponge made every minute of prep time disappear.
Ingredients
- All-purpose flour: The backbone of your sponge—make sure it's measured by weight if possible, because scooping straight from the bag tends to pack too much flour in.
- Baking powder: This is what gives you that tender crumb and gentle rise; don't skip checking the expiration date on yours.
- Granulated sugar and unsalted butter: Room temperature is non-negotiable here—cold butter won't cream properly with the sugar, and you'll lose that light, fluffy texture that makes this cake special.
- Eggs: Also room temperature; they incorporate more smoothly and help create that silky batter.
- Pure vanilla extract: The real stuff makes a noticeable difference in taste, not just in theory.
- Whole milk: Brings tenderness and helps balance the richness of the butter.
- Unsalted butter and powdered sugar for frosting: The unsalted butter gives you control over the salt level, and sifted powdered sugar prevents lumps that can make frosting feel grainy.
- Gel food coloring: If you want to match school colors, gel holds its shade better than liquid food coloring and doesn't thin out your frosting.
- Balloon toppers: These transform a cake from homemade to celebratory—they're the finishing touch that makes people smile before they even taste it.
Tired of Takeout? 🥡
Get 10 meals you can make faster than delivery arrives. Seriously.
One email. No spam. Unsubscribe anytime.
Instructions
- Heat your oven and prepare your pans:
- Preheat to 350°F and grease those pans thoroughly, then line them with parchment paper cut to fit the bottom. This double protection ensures your cakes release cleanly without sticking or tearing.
- Mix your dry ingredients:
- Whisk together flour, baking powder, and salt in a medium bowl until evenly combined. This prevents lumps in your final batter and distributes the leavening agent uniformly.
- Cream butter and sugar until fluffy:
- Beat them together for 3 to 5 minutes until the mixture looks pale and airy, almost like fluffy clouds. This is where you're incorporating air that helps your cake rise gently and evenly.
- Add eggs one at a time with patience:
- After each egg goes in, beat well before adding the next one; this prevents the batter from looking curdled or broken. Mix in your vanilla extract after the last egg.
- Alternate flour and milk carefully:
- Start with flour, then milk, then flour again, ending with flour—this sequence prevents overworking the batter. Mix on low speed until just combined; lumps are okay, overmixing creates tough cakes.
- Fill your pans strategically:
- Divide the batter so the 8-inch and 6-inch pans get equal amounts, then tap each pan gently on the counter to release trapped air bubbles. You want an even surface when they cool.
- Bake with attention to timing:
- The 8-inch cakes need 35 to 40 minutes, while the 6-inch cakes bake faster in 25 to 30 minutes; start checking with a toothpick a few minutes early. The cake is done when a toothpick inserted in the center comes out clean or with just a few moist crumbs clinging to it.
- Cool with intention:
- Let cakes rest in their pans for 10 minutes so they firm up slightly, then turn them out onto wire racks. Complete cooling takes a couple of hours, and this step is absolutely crucial for the next stages.
- Beat your frosting until it's silky:
- Start by creaming the butter until it's pale and fluffy, then gradually add powdered sugar while beating. Add milk or cream one tablespoon at a time until you reach that perfect spreadable consistency—it should hold peaks but not be so thick it tears the cake.
- Level and layer your first tier:
- If your cake tops are domed, slice them level with a serrated knife or cake leveler. Place one 8-inch layer on your cake board, spread buttercream on top, then add the second 8-inch layer; repeat for the 6-inch cakes.
- Apply the crumb coat and chill:
- Spread a thin layer of frosting all over each cake to seal in any crumbs, then pop both tiers into the fridge for 20 minutes. This step is the secret to smooth, professional-looking frosting.
- Frost with your final layer:
- Using an offset spatula and rotating your turntable, apply the remaining frosting smoothly to both cakes. Take your time here; this is what people actually see.
- Stack with support:
- Center your 6-inch tier on top of the 8-inch tier, using dowels or plastic straws inserted into the larger cake to prevent the weight from crushing down. This invisible support system keeps your cake looking perfect.
- Crown with balloons and celebrate:
- Place your balloon toppers on the peak of the cake, add any edible confetti or sprinkles, and step back to admire your work. This moment of completion is genuinely satisfying.
 Save It
 Later, when people were texting my cousin photos from the party, I realized that baking this cake had been as much about showing up for her as it was about flour and eggs. She kept one of the balloon toppers as a keepsake, and every time she sees it, she thinks about that moment the cake arrived at her celebration.
The Science Behind the Sponge
Vanilla sponge cake is a study in balance—you're working with the creaming method, which relies on beating butter and sugar together to trap tiny air bubbles. Those bubbles expand in the oven and create lift, but only if you don't deflate them by overmixing later. The milk softens the crumb and keeps it tender, while the eggs bind everything together and add richness. Understanding this helps you troubleshoot if something feels off.
Two-Tier Architecture and Stability
The jump from baking a single layer cake to stacking two tiers can feel intimidating, but it's mostly about understanding weight distribution. The larger cake at the bottom carries the load, and those dowels or straws you insert act like invisible pillars, preventing the top tier from sinking into the frosting. Some people worry about overkill, but honestly, there's no such thing—better to support properly than to watch your masterpiece slowly collapse mid-party.
Flavor Variations and Personal Touches
The vanilla sponge base is endlessly adaptable if you want to make it more personal. A teaspoon of almond extract alongside the vanilla creates a subtle nod to marzipan, while lemon zest mixed into the batter adds brightness without overwhelming the crumb. For frosting, some people tint it with school colors, others add a touch of cream cheese for tang, and a few adventurous souls have mixed in crushed candy or cookie crumbs. The framework stays solid; the personality comes from your choices.
- Almond extract pairs beautifully with this vanilla base and feels fancy without being complicated.
- Lemon zest added directly to the batter distributes evenly and brightens every bite.
- Gel food coloring keeps your frosting texture perfect while delivering vibrant shades for any celebration theme.
 Save It
 Every time someone bakes this cake for a milestone, they're doing more than following instructions—they're creating a moment that lingers. Make it with joy, trust your instincts, and let the celebration happen around the table.
Common Questions About Recipes
- → What pans are used for the cake layers?
Two 8-inch and two 6-inch round cake pans are used to create the distinct two-tier layers.
- → How is the buttercream frosting prepared?
Butter is beaten creamy, then powdered sugar, vanilla, salt, and milk or cream are gradually added until smooth and spreadable.
- → How can I add color to the frosting?
Gel food coloring can be mixed into the buttercream to match desired themes or school colors.
- → How should the cake be assembled?
Cakes are layered with buttercream between tiers, crumb coated, chilled, then frosted smoothly before stacking the smaller tier atop the larger one using dowels or straws for support.
- → What decorations are recommended?
Balloon cake toppers and edible confetti or sprinkles add playful and festive visual interest to the cake.
- → Can this cake be customized for flavors?
Yes, lemon or almond extracts can be added to the batter for additional flavor nuances.