 Save It
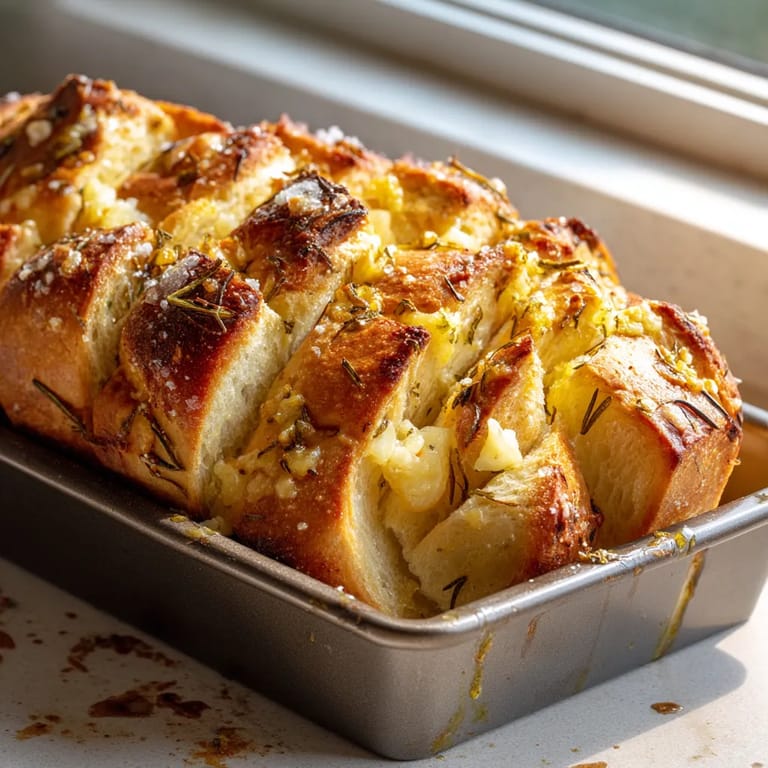
 This rosemary garlic pull apart bread transforms any ordinary meal into something special. The warm, fragrant loaf filled with herbs and cheese creates those irresistible layers that everyone loves to pull apart and savor. After years of baking bread, this recipe has become my signature dish whenever I host dinner parties.
I first created this bread when hosting an impromptu pasta night for friends. What started as a simple side dish became the star of the evening with everyone requesting the recipe before they left. Now I keep the ingredients on hand for whenever I need to make something impressive with minimal effort.
Ingredients
- Platinum Yeast from Red Star: ensures reliable rising every time even for beginners
- Whole milk: creates a tender crumb structure for that perfect soft texture
- Fresh rosemary: delivers vibrant flavor look for bright green sprigs that are fragrant when touched
- Garlic: adds savory depth freshly minced cloves will give the most pronounced flavor
- Soft butter: creates pockets of richness throughout the bread
- Parmesan cheese: forms delicious crusty edges when baked use freshly grated for best melting
Tired of Takeout? 🥡
Get 10 meals you can make faster than delivery arrives. Seriously.
One email. No spam. Unsubscribe anytime.
Step-by-Step Instructions
- Activate the Yeast:
- Combine yeast with warm milk and sugar in your mixing bowl. The milk must be around 110°F warm enough to activate the yeast but not hot enough to kill it. After 5 10 minutes you should see a frothy surface indicating active yeast. This foundation ensures your bread will rise properly.
- Create the Dough:
- Add the butter egg flour salt garlic powder and rosemary to your yeast mixture. Mix everything until a soft dough forms. The dough should feel slightly tacky but not sticky to the touch. Knead for a full 5 minutes to develop the gluten structure which gives your bread its perfect chew. This step cannot be rushed as proper gluten development creates that ideal bread texture.
- First Rise:
- Place the dough in a greased bowl cover with a damp cloth and let it rise until doubled in size. This will take 60 90 minutes depending on your kitchen temperature. Look for a dough that springs back slowly when gently poked with your finger. This patient waiting period allows fermentation which creates both flavor and structure.
- Prepare the Filling:
- Mix the extra soft butter with chopped herbs garlic and salt until uniformly combined. The butter should be spreadable but not melted. Take time to chop the herbs very finely to distribute their flavor evenly throughout each layer of bread. The filling is what makes each pull apart section burst with flavor.
- Shape the Bread:
- Divide the dough into 12 equal pieces and flatten each into circles. Spread filling on each circle add cheese and fold them in half. Arrange in your loaf pan with rounded sides facing upward. This careful assembly creates those distinct layers that pull apart so satisfyingly when baked.
- Final Rise and Bake:
- Allow the assembled loaf to rise again until noticeably puffy then bake until deeply golden brown. The internal temperature should reach about 190°F for perfectly baked bread. The double rise ensures a light airy texture while the long bake time allows the flavors to fully develop and the cheese to melt into every crevice.
 Save It
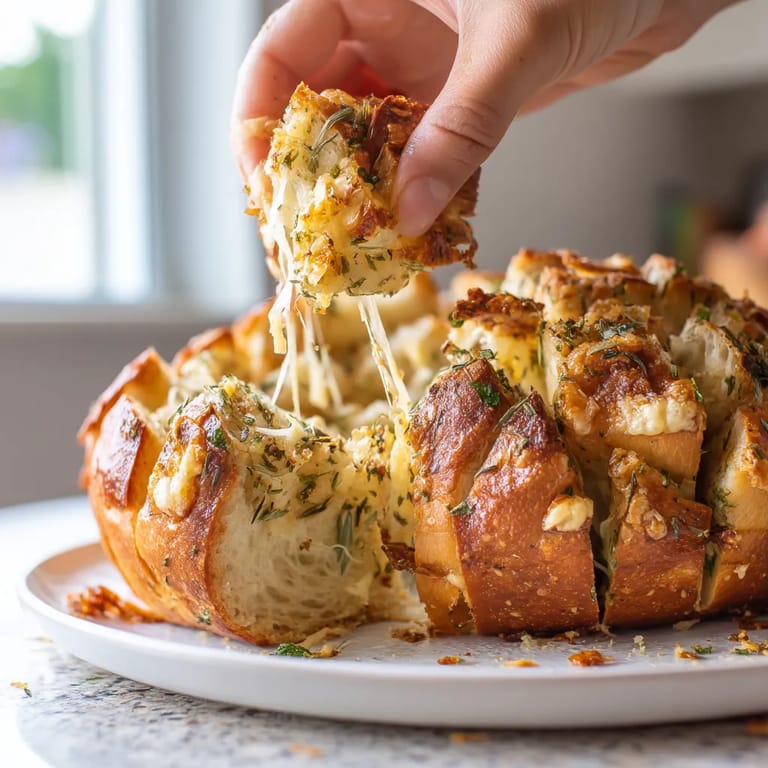
 My favorite part of making this bread is watching peoples faces when they take their first bite. The combination of butter fresh herbs and cheese creates such an intense flavor that even seasoned bakers ask for my secret. There truly is nothing that brings people together quite like homemade bread still warm from the oven.
Make Ahead Options
The beauty of this recipe lies in its flexibility. You can prepare the dough up to two days ahead and keep it refrigerated. The slow cold fermentation actually improves the flavor adding complexity that you cannot achieve with a quick rise. When ready to bake simply remove the dough from the refrigerator allow it to come to room temperature about 1 hour then proceed with shaping and the second rise.
For longer storage freeze the shaped unbaked dough in the loaf pan. Thaw overnight in the refrigerator then allow to complete the second rise at room temperature before baking. This method ensures you can have fresh baked bread even on busy days.
Flavor Variations
While rosemary and garlic create a classic pairing this versatile dough welcomes creative adaptations. Try substituting fresh thyme and lemon zest for a bright citrusy version perfect with fish dishes. For a Mediterranean twist incorporate sun dried tomatoes olives and feta cheese into the filling.
The cheese component can be customized to match your meal. Sharp cheddar pairs beautifully with soups while smoked gouda adds depth to a bread served alongside grilled meats. The possibilities are endless making this recipe a true chameleon in your cooking repertoire.
Serving Suggestions
This pull apart bread shines as part of a complete meal experience. Serve it still warm alongside pasta dishes allowing the bread to soak up rich sauces. For entertaining arrange the bread on a wooden board with olive oil for dipping creating an interactive appetizer.
The bread also makes an excellent foundation for simple sandwiches. The herb infused layers add instant flavor to even basic fillings like sliced turkey or fresh vegetables. For brunch slice it horizontally and use as the base for savory French toast topped with eggs and fresh herbs.
Save It Common Questions About Recipes
- → Can I use different herbs in this bread?
Absolutely! While rosemary pairs beautifully with garlic in this bread, you can substitute or add other herbs like thyme, sage, or oregano based on your preference. Just maintain similar quantities to ensure the flavor balance isn't overwhelmed.
- → How do I know when the dough has risen enough?
The dough should roughly double in size during both rise periods. A good test is to gently press a finger into the dough - if the indentation remains, the dough is ready. If it springs back immediately, it needs more time to rise.
- → What cheeses work best in this bread?
Parmesan provides a nice savory flavor, but mozzarella offers better meltiness and cheddar gives a sharper taste. You can use any of these or blend them. For best results, use freshly grated cheese rather than pre-packaged options which contain anti-caking agents.
- → Can I make this bread ahead of time?
Yes! You can prepare the dough and refrigerate it for up to 2 days before baking. You can also freeze the baked loaf for up to 3 months. For best results when serving from frozen, thaw completely and reheat in a 300°F oven for 10-15 minutes.
- → Why is my dough too sticky to work with?
Dough consistency can vary based on humidity and flour properties. If your dough is too sticky, gradually add more flour, 1 teaspoon at a time, until it becomes manageable. The dough should feel soft and slightly tacky but not sticky enough to cling to your fingers.
- → How should I store leftover pull-apart bread?
Store cooled leftovers in an airtight container at room temperature for up to 2 days or refrigerate for up to 5 days. Reheat individual portions in the microwave for 15-20 seconds or warm the entire loaf in a 300°F oven for 5-10 minutes for the best texture.