 Save It
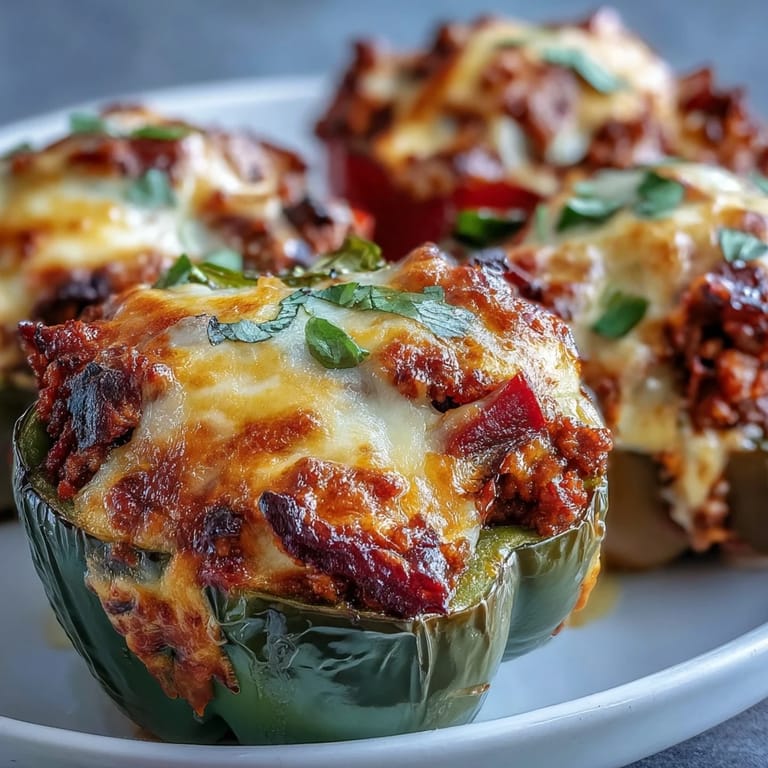
 There's something deeply satisfying about watching a bell pepper transform from an empty shell into a vessel of savory, cheesy goodness, and it happened by accident one weeknight when I was tired of the usual keto rotation. I'd bought those gorgeous multicolored peppers at the market, intending to roast them with olive oil, but instead found myself pulling out ground beef and spices, remembering a conversation with a friend who swore by stuffed peppers as her weeknight lifesaver. Twenty minutes later, with melted cheddar bubbling on top and cilantro scattered across the plate, I understood the appeal completely.
I made this for my partner on a Tuesday night when he'd had a rough day, and there's this particular kind of quiet joy that comes with sliding a hot stuffed pepper onto someone's plate, knowing they didn't expect dinner to be this good or this easy. He took one bite and looked up at me with that expression that says everything, and suddenly it wasn't just about hitting protein macros anymore—it was about the small act of feeding someone well.
Ingredients
- Bell Peppers: Choose four large ones in any color you like, though I've found the red and yellow ones cook slightly faster than green since they're sweeter and more tender to begin with.
- Ground Beef: The 80/20 blend is your friend here because you need just enough fat to keep the filling moist without turning it into a puddle of grease by the time it hits the oven.
- Onion and Garlic: These two are non-negotiable for building that savory foundation that makes the whole dish smell incredible while it cooks.
- Tomato Paste and Fresh Tomato: The paste concentrates flavor while the diced tomato adds texture and a slight brightness that cuts through the richness.
- Spice Blend: Cumin, chili powder, smoked paprika, and oregano create that unmistakable taco profile, but don't skip the paprika if you want that subtle smoky note that makes people ask what you did differently.
- Cheddar Cheese: Shredded is essential because block cheese won't melt as evenly, and uneven melting is the enemy of a beautiful finish.
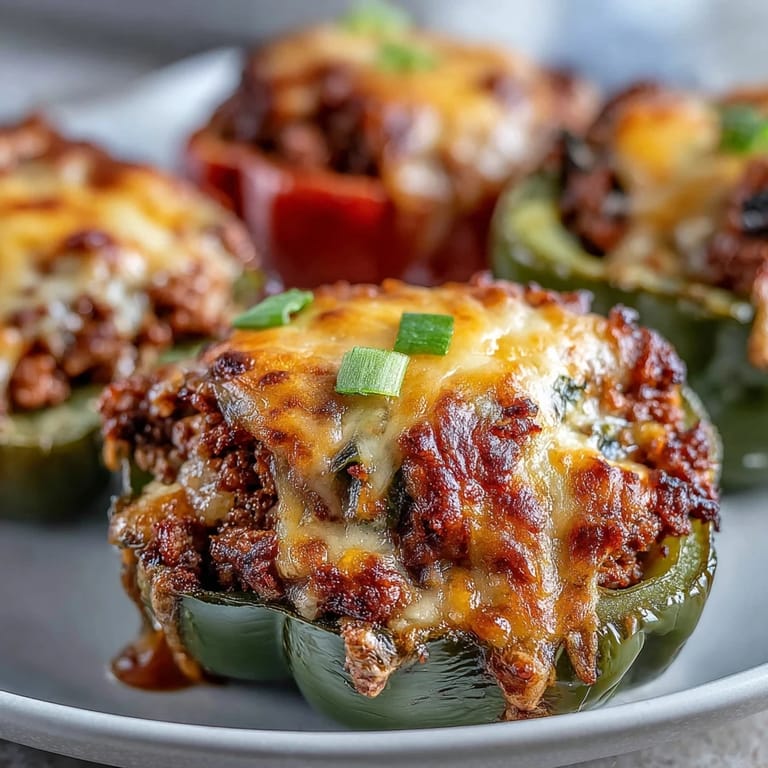
- Optional Garnishes: Fresh cilantro and scallions brighten everything up, though sour cream is the real MVP if you want to cool down the spices and add richness.
Tired of Takeout? 🥡
Get 10 meals you can make faster than delivery arrives. Seriously.
One email. No spam. Unsubscribe anytime.
Instructions
- Set Your Stage:
- Get your oven to 375°F and grease a baking dish while it preheats, then slice the pepper tops off and hollow them out completely, making sure you remove all the seeds and white ribs inside. A small paring knife works perfectly for this, and don't worry if they wobble a bit—they'll stabilize as you fill them.
- Build the Filling Base:
- Heat olive oil in a large skillet and let it shimmer before adding your chopped onion and minced garlic, cooking until they soften and release that sweet, fragrant aroma that fills your whole kitchen. You'll know it's ready when the onion turns translucent and you catch yourself just breathing in the smell for a moment.
- Brown the Beef:
- Add your ground beef to the aromatic base and break it up with a wooden spoon, cooking until there are no pink bits left and it's developed a nice golden-brown crust in spots. If you end up with a slick pool of grease, pour some off into a container—you want moist filling, not greasy filling.
- Layer In the Flavors:
- Add your diced tomato and tomato paste first, then all those beautiful spices—the cumin, chili powder, smoked paprika, and oregano—and let everything simmer together for just a few minutes until it smells absolutely irresistible. The spices will bloom and marry together, and you'll see the mixture thicken slightly as the tomato paste does its magic.
- Stuff and Top:
- Spoon the taco filling generously into each hollow pepper, packing it in gently but firmly so it stays put, then crown each one with a generous handful of shredded cheddar cheese. The cheese should form a little mound on top that looks like it's ready to melt into pools of golden deliciousness.
- The Bake:
- Cover the baking dish loosely with foil and slide it into the oven for 20 minutes to let the peppers soften and the filling heat through, then remove the foil and bake uncovered for another 10 minutes until the cheese is melted and bubbly with a few golden spots. The peppers should be tender enough to cut through easily, and the cheese should have that slight wobble that tells you it's perfectly melted.
 Save It
 This dish has become one of those recipes I return to on nights when I need to feed people well but don't have much energy for complexity, and somehow it always feels like I've done something special. There's something about a stuffed pepper that reads as effort even when the actual work is minimal, which might be the best kind of kitchen magic.
Variations and Swaps That Work
I've made these with ground turkey when I wanted something lighter, and honestly, the flavor barely suffers because the spice blend and cheddar carry so much of the taste that the type of meat almost becomes secondary. You could also crumble ground lamb in there if you're feeling adventurous, and the Mediterranean angle would shift the whole vibe of the dish in an interesting way.
Storage and Reheating
These peppers refrigerate beautifully for three or four days, which makes them perfect for meal prep, and they actually taste slightly better the next day when all the flavors have had time to get cozy with each other. Reheat them covered with foil in a 350°F oven for about 10 minutes, just until they're warmed through without drying out.
Making It Your Own
The beauty of stuffed peppers is that they're flexible enough to welcome your personal touches without falling apart. I've added sliced jalapeños for heat, stirred in cream cheese for extra richness, and even mixed in some cauliflower rice to stretch the filling further without compromising the flavor or the macros.
- If you want more heat, add fresh jalapeño slices to the filling or scatter them on top before the final bake.
- For a dairy-free version, swap the cheddar for a plant-based melt that actually melts well, and skip the sour cream or use a cashew-based alternative.
- Serve these alongside a simple green salad or with avocado slices for a complete meal that feels both indulgent and nourishing.
 Save It
 There's something wonderfully unpretentious about this dish—it shows up as exactly what it is, no fancy plating required, just honest food that tastes good and makes you feel taken care of. That's the kind of recipe worth returning to again and again.
Common Questions About Recipes
- → Can I make these stuffed peppers ahead of time?
Yes, you can prepare the peppers and filling up to 24 hours in advance. Store them separately in the refrigerator, then stuff and bake when ready to serve. You may need to add a few extra minutes to the baking time if baking cold.
- → What other ground meats work well in this filling?
Ground turkey, chicken, or pork make excellent alternatives to beef. Turkey and chicken will be leaner, so consider adding a tablespoon of olive oil to prevent the filling from drying out during cooking.
- → How do I know when the peppers are fully cooked?
The peppers are done when they're tender when pierced with a fork, the cheese is melted and bubbly with golden spots, and the filling is hot throughout. This typically takes 30 minutes total baking time.
- → Can I freeze leftover stuffed peppers?
Absolutely. Let them cool completely, then wrap individually in plastic wrap and foil. Freeze for up to 3 months. Thaw overnight in the refrigerator and reheat in a 180°C (350°F) oven until heated through.
- → What sides pair well with this dish?
A crisp green salad with avocado, cauliflower rice, or roasted vegetables make perfect keto-friendly sides. If you're not strictly low-carb, Mexican rice or warm tortillas complement the Tex-Mex flavors beautifully.
- → How can I make this dish dairy-free?
Use a plant-based shredded cheese alternative or simply omit the cheese topping entirely. The peppers and filling are delicious on their own, or you could top with dairy-free sour cream or guacamole after baking.