 Save It
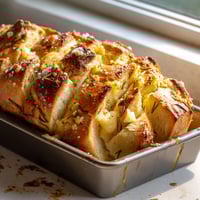
 This rustic Gruyère & Thyme Fall Focaccia has become my autumn ritual, filling my kitchen with the irresistible aroma of fresh bread and herbs just as the leaves begin to change. The combination of melted Gruyère and earthy thyme creates a bread that's both comforting and sophisticated enough for any fall gathering.
I discovered this recipe three years ago when hosting a harvest dinner, and it's now requested at every autumn gathering. The way the cheese creates little pockets of melty goodness against the herb-infused dough makes even experienced bakers at my table ask for the recipe.
Ingredients
- All-purpose flour: 480 g (4 cups) The backbone of our focaccia providing structure and that classic bread texture
- Instant yeast: 2¼ tsp (1 packet) Gives reliable rise without the need for proofing first
- Salt: 1½ tsp Enhances all the flavors and strengthens the gluten structure
- Sugar: 1 tbsp Feeds the yeast and helps achieve a golden crust
- Warm water: 360 ml (1½ cups) Activates the yeast look for water that feels like warm bath water
- Olive oil: 2 tbsp plus extra Creates tenderness in the crumb and helps achieve that signature crust
- Gruyère cheese: 150 g (1½ cups) The star ingredient with its nutty umami flavor choose a well-aged variety for the best flavor
- Fresh thyme leaves: 2 tbsp Fresh is crucial here as it infuses the bread with aromatic oils during baking
- Flaky sea salt: to finish That perfect finishing touch that adds both texture and flavor bursts
- Optional shallots or red onion: thinly sliced Adds sweet caramelized notes that complement the cheese beautifully
Tired of Takeout? 🥡
Get 10 meals you can make faster than delivery arrives. Seriously.
One email. No spam. Unsubscribe anytime.
Step-by-Step Instructions
- Create the Base Dough:
- In a large bowl combine flour yeast salt and sugar with precise measurements. Pour in the warm water around 110°F and olive oil. Mix until everything comes together in a shaggy mass making sure no dry flour remains at the bottom of the bowl. The dough will look rough at this stage which is exactly what you want.
- Develop the Gluten:
- Turn the dough onto a lightly floured surface and knead for a full 6 to 8 minutes. You will feel the dough transform from sticky and rough to smooth and elastic. When properly kneaded it should pass the windowpane test where a small piece can be stretched thin enough to see light through without tearing. This step builds the structure that will hold all those beautiful air bubbles.
- First Rise:
- Place your dough in a bowl greased with olive oil turning once to coat all sides. Cover with a damp cloth or plastic wrap and let it rise in the warmest spot in your kitchen for a full hour. The dough needs to double in size which indicates the yeast has created enough carbon dioxide to give your focaccia its signature airy texture.
- Shape and Second Rise:
- Pour a generous tablespoon of olive oil into your baking pan coating the entire surface. Gently transfer your risen dough to the pan using your fingertips to stretch it toward the edges. Be patient here stretching a little then letting it rest if it resists. Once fitted to the pan let it rest uncovered for 30 minutes to relax the gluten and rise slightly again.
- Create the Signature Texture:
- Preheat your oven to 220°C. With oil on your fingertips press deeply into the dough creating those characteristic dimples all over the surface. These indentations will catch the olive oil and toppings while creating the varied texture focaccia is known for. Drizzle another tablespoon of olive oil ensuring it pools slightly in the dimples.
- Apply the Toppings:
- Sprinkle the shredded Gruyère evenly across the surface allowing some to fall into the dimples. Scatter fresh thyme leaves throughout making sure they're distributed evenly for consistent flavor in every bite. If using shallots arrange them on top pressing lightly so they adhere. Finish with a generous sprinkle of flaky sea salt which will create little bursts of flavor.
- Bake to Golden Perfection:
- Bake in the preheated oven for exactly 22 to 25 minutes. Look for a deep golden brown crust and bubbling cheese. The bottom should sound hollow when tapped indicating it's cooked through. Allow to cool in the pan for 5 minutes before transferring to a wire rack to prevent sogginess.
 Save It
 The Gruyère cheese is what transforms this from ordinary focaccia to something extraordinary. I discovered this combination after experimenting with different cheeses and found that Gruyère's nutty profile perfectly complements the earthy thyme. My daughter who typically avoids herbs in bread devoured three pieces at our last family dinner declaring it "the bread that changed everything."
The Perfect Rise
Achieving that airy texture in focaccia depends largely on proper rising conditions. For the best results place your covered dough in a slightly warm environment around 75°F to 80°F. I often turn my oven on for just 1 minute then turn it off and place the dough inside with the door closed. This creates the perfect environment for yeast to work its magic. In cooler kitchens the rise may take longer up to 90 minutes but it's worth the wait for that perfect texture.
Make It Your Own
While the Gruyère and thyme combination is magnificent this focaccia welcomes creative variations. During late summer I fold halved cherry tomatoes into the surface before baking. In winter rosemary and crushed garlic make a heartier version. For cheese alternatives consider fontina for its melting qualities or a sharp cheddar for more pronounced flavor. The key is maintaining the same ratio of toppings to dough regardless of what ingredients you choose.
Serving Suggestions
This focaccia reaches its peak potential when served slightly warm about 10 minutes after coming out of the oven. Pair it with a robust fall soup like butternut squash or mushroom for a complete meal. For entertaining cut into small squares and serve alongside a cheese board and olives. My favorite way to enjoy leftovers is to split a piece horizontally toast it lightly and use it as the base for an open-faced sandwich with roasted vegetables and a smear of ricotta.
Storage Solutions
Proper storage is essential to maintain the contrasting textures that make this focaccia special. For same-day storage wrap cooled focaccia in a clean kitchen towel which allows it to breathe while retaining moisture. For longer storage wrap tightly in plastic and keep at room temperature for up to 2 days. To refresh day-old focaccia sprinkle with a few drops of water and heat in a 350°F oven for 5 minutes. For freezing wrap individual portions in plastic then foil and freeze for up to 3 months thawing at room temperature before reheating.
Save It Common Questions About Recipes
- → Can I use other herbs instead of thyme?
Absolutely! While thyme pairs beautifully with Gruyère, you can substitute rosemary, sage, or oregano based on your preference. Each herb will create a different flavor profile while maintaining the rustic autumn character of the focaccia.
- → How should I store leftover focaccia?
Store cooled focaccia in an airtight container at room temperature for up to 2 days. For longer storage, wrap tightly and freeze for up to 1 month. Reheat frozen or day-old focaccia in a 350°F oven for 5-10 minutes to refresh the texture.
- → Can I make the dough ahead of time?
Yes! You can prepare the dough and let it rise in the refrigerator overnight (first rise). This slow fermentation actually enhances flavor. Remove from the refrigerator about 1 hour before shaping to allow it to come to room temperature before proceeding.
- → What cheese can I substitute for Gruyère?
If Gruyère isn't available, try Emmental, Comté, or aged Swiss cheese for similar nutty flavors. For different profiles, consider fontina, gouda, or a mixture of mozzarella and parmesan. Each cheese will melt differently, so adjust quantities based on moisture content.
- → How do I know when my focaccia is properly baked?
Properly baked focaccia should be golden brown on top and sound hollow when tapped on the bottom. The internal temperature should reach about 200°F (93°C). If the top browns too quickly, tent with foil and continue baking until the bread is cooked through.
- → Can I make this focaccia without a stand mixer?
Absolutely! While a stand mixer makes the process easier, you can mix and knead the dough entirely by hand. Combine ingredients with a wooden spoon until a shaggy dough forms, then transfer to a floured surface and knead for 8-10 minutes until smooth and elastic.