 Save It
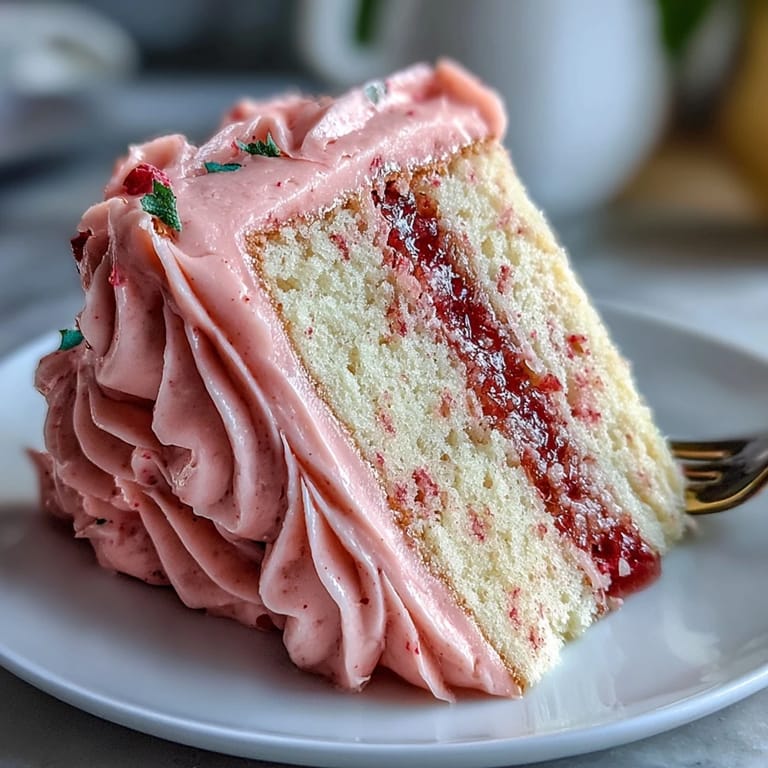
 My friend texted me a photo of a cake she'd seen on someone's Instagram—those impossibly perfect pink layers fading from deep to pale, crowned with fresh strawberries. She said, half-joking, that it looked too pretty to eat. But that's exactly why I had to make it. The challenge of creating something beautiful that also tasted genuinely delicious kept me thinking about it for days. When I finally baked these three vanilla layers and mixed up my strawberry buttercream, something clicked. This cake became my answer to every celebration that needed a little extra magic.
I made this for a Valentine's Day dinner party last year, and watching my guests pause before cutting into it told me everything. They were torn between wanting to eat it and wanting to photograph it first. One person actually said it was almost a shame to ruin something so beautiful, but then she took a bite and changed her mind completely. That night reminded me that the best desserts do more than taste good—they create a moment.
Ingredients
- All-purpose flour: The foundation of a tender crumb; make sure it's measured by weight if possible, as scooping directly from the bag often packs it down and throws off your ratios.
- Baking powder: Use fresh baking powder, not the kind that's been open for three years gathering moisture in your cabinet—it really does affect rise and texture.
- Unsalted butter: Room temperature is non-negotiable here; cold butter won't cream properly with the sugar, and you'll end up with a dense cake instead of a fluffy one.
- Granulated sugar: This sweetens the cake and helps create that light, airy crumb when beaten with butter.
- Large eggs: Also room temperature; cold eggs won't incorporate smoothly and can cause the batter to break or look curdled.
- Pure vanilla extract: Imitation works in a pinch, but pure vanilla adds a subtle warmth that actually matters in such a simple cake.
- Whole milk: Room temperature milk is key to keeping the batter smooth and emulsified as you alternate it with the dry ingredients.
- Powdered sugar: Sift it before using, or you'll spend forever trying to beat out lumps from your buttercream and risk an grainy texture.
- Freeze-dried strawberries: Ground into a fine powder, these deliver intense strawberry flavor without adding moisture that would make buttercream separate or weep.
- Heavy cream or milk: A small amount helps loosen the buttercream to spreading consistency without making it too soft or shiny.
- Pink gel food coloring: Gel holds up better than liquid coloring and won't thin out your buttercream like water-based dyes would.
- Fresh strawberries: Optional but worth the investment—they finish the cake and remind everyone exactly what they're tasting.
Tired of Takeout? 🥡
Get 10 meals you can make faster than delivery arrives. Seriously.
One email. No spam. Unsubscribe anytime.
Instructions
- Heat your oven and prep your pans:
- Set your oven to 350°F and give it a few minutes to fully preheat. Grease three 8-inch round cake pans, line them with parchment, and grease the parchment too—you want those cakes to glide right out without sticking.
- Combine your dry ingredients:
- Whisk together the flour, baking powder, and salt in a medium bowl. This step matters more than people think because it distributes the leavening evenly throughout the batter instead of leaving little pockets of baking powder.
- Cream the butter and sugar:
- Beat your room-temperature butter with the sugar on medium-high speed for about three minutes until the mixture is pale, fluffy, and looks almost like wet sand. This aerating step is what gives your cake that tender, feathery crumb.
- Add your eggs one at a time:
- Drop in each egg, let it fully incorporate before adding the next, then add your vanilla. This patience prevents the batter from looking broken or separated, which would give you a denser cake.
- Alternate flour and milk:
- Starting and ending with the flour mixture, add the dry ingredients and milk in three additions each, mixing just until combined after each. Overmixing at this point develops gluten, which makes cakes tough—stop as soon as you don't see any white streaks.
- Divide and bake:
- Pour the batter evenly into your three prepared pans, smooth the tops, and bake for 25 to 30 minutes until a toothpick poked into the center comes out clean or with just a few moist crumbs. You're looking for barely set, not bone dry.
- Cool with patience:
- Let the cakes cool in their pans for 10 minutes—this is the sweet spot where they're set enough to handle but still warm enough to release cleanly. Then turn them out onto wire racks and let them cool completely, at least an hour.
- Make your strawberry buttercream:
- Beat softened butter until it's pale and creamy, then gradually add the sifted powdered sugar and ground freeze-dried strawberries. Mix in the cream, vanilla, and salt, then beat everything until it's fluffy and holds soft peaks.
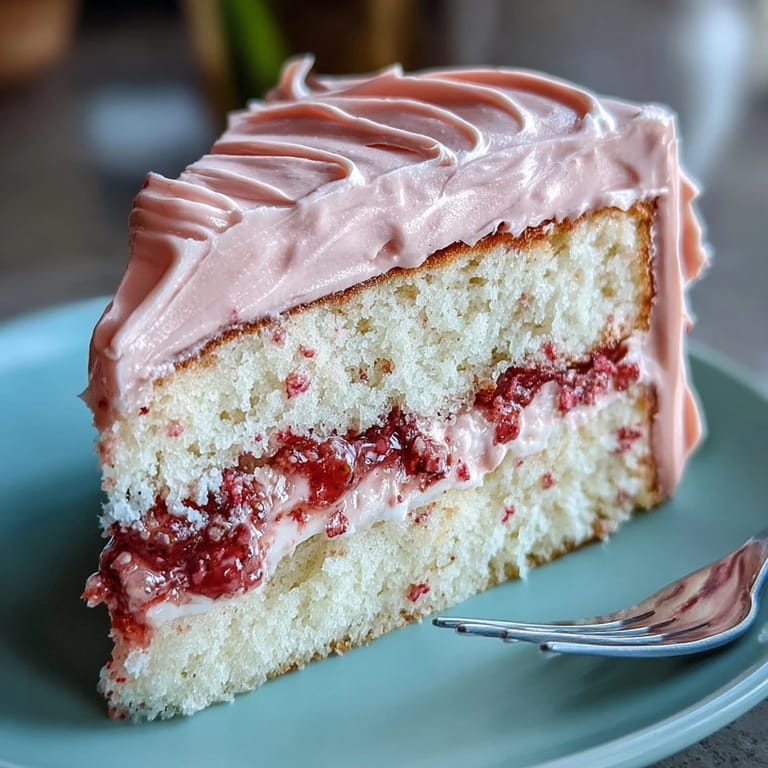
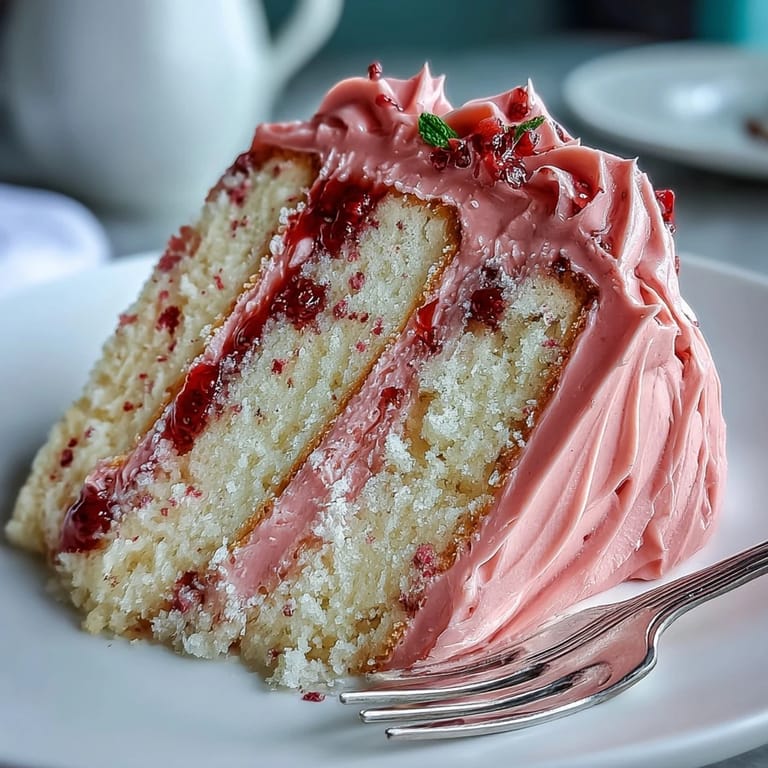
- Create your ombre effect:
- Divide the buttercream into three bowls—leave one plain or very pale pink, tint the second a medium pink, and the third a deep pink using gel coloring. Put each into a separate piping bag.
- Assemble and frost:
- If your cake layers have domed tops, level them off with a serrated knife so they stack evenly. Place the first layer on your serving plate, pipe a ring of the lightest buttercream around the edge, and spread a thin layer across the top. Repeat with the remaining layers, using progressively darker shades.
- Apply the ombre frosting:
- Spread the darkest pink around the bottom third of the cake, medium pink in the middle section, and lightest pink on top. Use an offset spatula to blend the colors slightly where they meet—you're going for a soft gradient, not harsh stripes.
- Garnish and chill:
- Top with fresh strawberries and edible glitter if you like, then pop the whole cake into the fridge for at least 30 minutes. Cold cakes cut cleaner, and chilling lets all the flavors settle together.
 Save It
 There's a specific moment that happens when you step back from frosting this cake and see the full ombre effect come together—it's like something shifted from 'nice project' to 'real accomplishment.' I realized then that baking this cake was less about impressing people and more about proving to myself that beautiful, delicious things don't have to be complicated or out of reach.
Why Three Layers Matter
I used to make two-layer cakes, but the three-layer structure is what actually lets the ombre effect sing. With only two layers, the color gradient feels rushed. Three layers give you the room to show a real progression from dark to light, and the cake itself gets taller and more elegant looking. Plus, you get more frosting layers to enjoy, which is never a complaint in my kitchen.
The Freeze-Dried Strawberry Secret
The first time I made this, I tried using fresh strawberries blended into the buttercream. It looked amazing for about two hours, then slowly separated into a greasy mess as the strawberry juices leaked into the butter. That's when I discovered freeze-dried strawberries, and honestly, they're better anyway—more concentrated flavor, no moisture issues, and they stay stable for days. Now when someone asks why their strawberry frosting gets weepy, I always tell them the same thing I learned the hard way.
Timing and Make-Ahead Options
One of my favorite things about this cake is how flexible it is with timing. You can bake the layers up to a month ahead and freeze them wrapped well, then make the buttercream and assemble everything the day of. I've even made the buttercream two days ahead and stored it in an airtight container in the fridge. Just bring it back to room temperature and give it a quick beat before frosting. If you're short on time, bake everything in the morning and assemble in the evening once the cakes are completely cool.
- Cake layers keep frozen for up to one month if wrapped tightly in plastic wrap and foil.
- Buttercream lasts three days in the fridge and can be re-whipped if it gets too soft.
- The fully assembled cake keeps chilled for two days, though it's best eaten within 24 hours when the cake is freshest.
 Save It
 Make this cake for someone you want to impress, or make it for yourself on a day when you need to create something beautiful. Either way, you'll end up with three layers of tender vanilla cake and buttercream that tastes like real strawberries—which is exactly the point.
Common Questions About Recipes
- → How do I achieve the pink ombre effect on the frosting?
Divide the strawberry buttercream into three bowls, tinting each with varying amounts of pink gel food coloring for light, medium, and dark shades. Apply from darkest at the bottom to lightest at the top and smooth to blend.
- → Can I prepare parts of the cake in advance?
Yes, the cake layers can be baked ahead and frozen for up to one month. Thaw completely before assembling and frosting.
- → What ingredients provide the strawberry flavor in the buttercream?
Finely ground freeze-dried strawberries are mixed into the buttercream to impart natural strawberry flavor without extra moisture.
- → What tools are essential for assembling this cake?
You will need round cake pans, mixing bowls, a stand or hand mixer, parchment paper, an offset spatula, cake scraper, and piping bags for layering and decorating.
- → How can I make the cake layers evenly flat for stacking?
Level the cake tops with a serrated knife or cake leveler before frosting to ensure even layers and a smooth finish.
- → Is there an option to enhance the strawberry taste between layers?
A thin layer of strawberry jam can be spread between the cake layers for extra flavor contrast.