 Save It
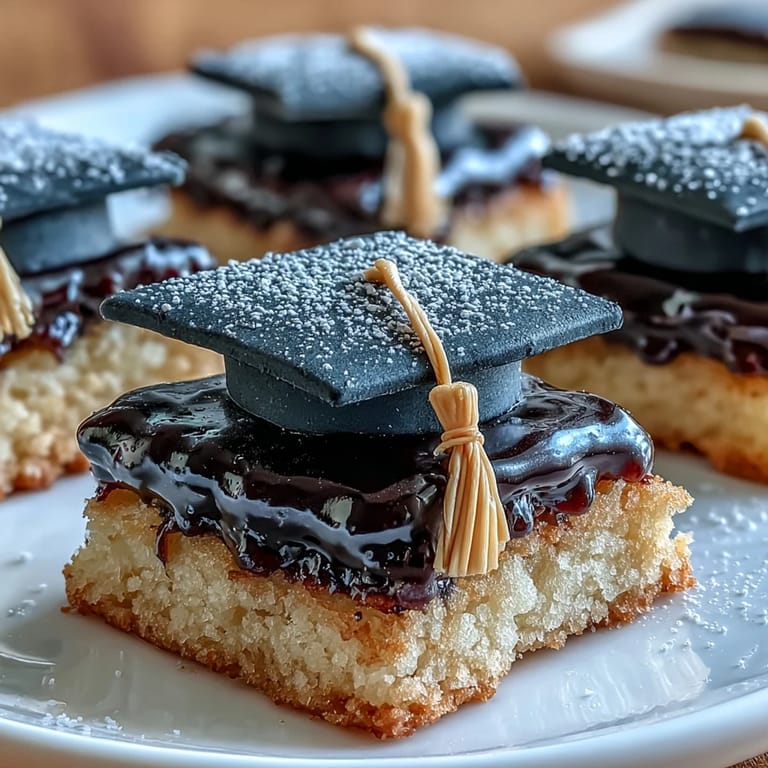
 My cousin's daughter called me in a panic three days before her graduation, asking if I could make something special for her party that didn't require a culinary degree. I'd been scrolling through cookie ideas when it hit me—why not combine her favorite sugar cookies with a little fondant magic to create mortarboards? By that evening, my kitchen was dusted with powdered sugar and scattered with tiny black fondant squares, and watching her face light up at the party made every sticky fingerprint worth it.
I'll never forget my friend Marcus showing up to help decorate, armed with nothing but confidence and a philosophy degree. Within twenty minutes, his mortarboards looked like modern art installations—lopsided in the most charming way—and we both couldn't stop laughing. He insisted the imperfect ones had "character," and honestly, his table of cookies sold out first.
Ingredients
- All-purpose flour (2 1/2 cups): This is your foundation, and measuring it correctly makes the difference between cookies that spread everywhere and ones that hold their shape with dignity.
- Unsalted butter (1 cup, softened): Cold butter means lumpy dough; softened butter creams into fluffy clouds that trap air and make these cookies tender.
- Granulated sugar (1 cup): This sweetens the dough and helps create those slightly crisp edges everyone loves.
- Baking powder (1/2 teaspoon): A small amount gives you a subtle lift without turning them into cake cookies.
- Egg and vanilla extract: These bind everything together and add richness that store-bought dough sometimes lacks.
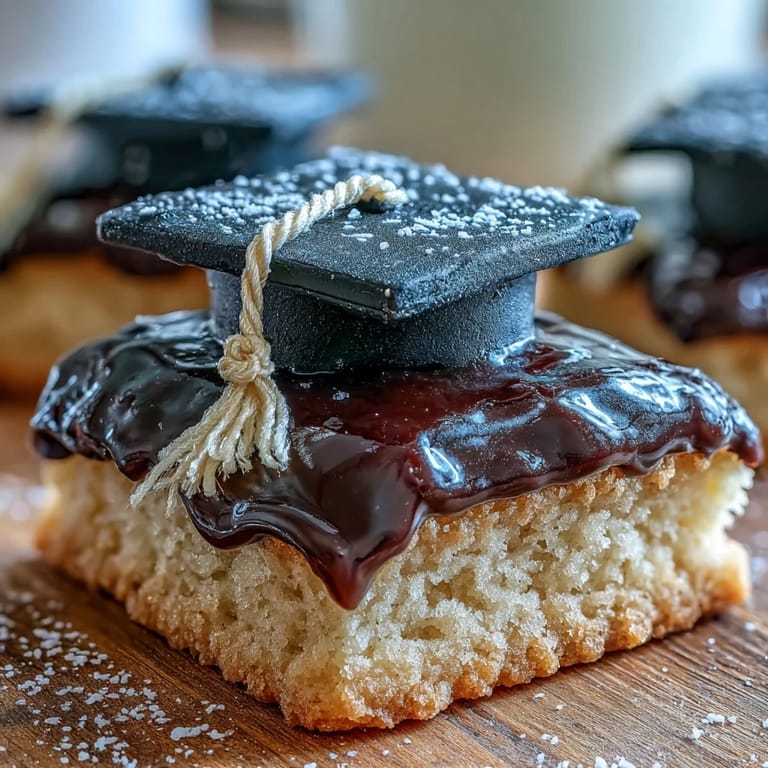
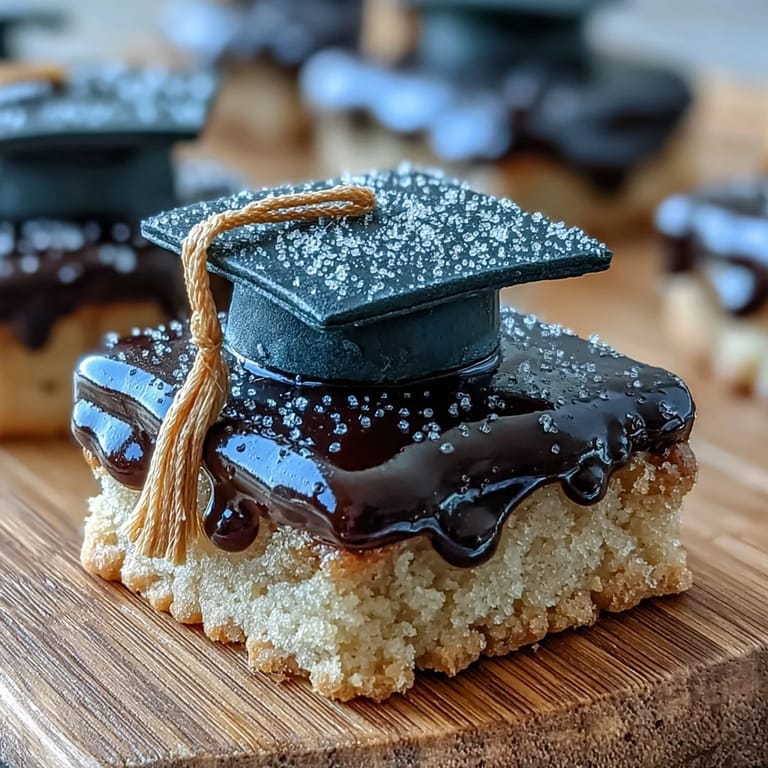
- Black fondant (8 oz): The star of the show—this sculpts into perfect mortarboard squares and bases that look almost too good to eat.
- Yellow fondant (1 oz): Just enough for those signature tassels that make people instantly recognize the graduation theme.
- Powdered sugar and milk (for icing): This simple royal-ish icing acts as edible glue, holding your fondant decorations firmly in place.
Tired of Takeout? 🥡
Get 10 meals you can make faster than delivery arrives. Seriously.
One email. No spam. Unsubscribe anytime.
Instructions
- Prepare your workspace:
- Preheat your oven to 350°F and line two baking sheets with parchment paper—this prevents sticking and gives you even browning on the bottoms.
- Mix the dry base:
- Whisk flour, baking powder, and salt together in a medium bowl; this aerates the flour and distributes the leavening evenly.
- Cream butter and sugar:
- Beat them together for 2–3 minutes until the mixture looks pale and fluffy, like whipped clouds—this is where the magic of texture begins.
- Add wet ingredients:
- Beat in the egg and vanilla until everything is combined and smooth.
- Bring it together:
- Gradually add your dry mixture to the wet ingredients, stirring gently until just combined; overmixing toughens cookies, so show some restraint here.
- Roll and cut:
- Roll dough to 1/4-inch thickness on a lightly floured surface and cut into 2 1/2-inch rounds or squares—uniform thickness means even baking.
- Bake until golden:
- Bake for 10–12 minutes, watching until the edges turn just golden; they'll continue cooking slightly as they cool, so don't overbake.
- Cool completely:
- Let cookies rest on the baking sheet for a minute, then transfer to a wire rack to cool fully before decorating.
- Prepare fondant pieces:
- While cookies cool, roll black fondant thin, cut 24 small squares for mortarboard tops, and shape 24 tiny cylinders for the bases. Roll yellow fondant into ropes and cut into tassel pieces.
- Make your icing:
- Mix powdered sugar, milk, and vanilla until smooth and spreadable—consistency matters, so add milk a little at a time.
- Decorate with intention:
- On each cooled cookie, pipe or spread a small amount of icing in the center, press a fondant square on top, position the cylinder beneath it, and attach a yellow tassel with another dab of icing.
- Let it set:
- Allow decorations to firm up for 20–30 minutes before packing or serving; this ensures everything stays put during transport.
 Save It
 There's something deeply satisfying about watching a simple sugar cookie transform into something that celebrates a milestone. My cousin texted me a photo from her daughter's graduation day—a whole tower of these cookies as the centerpiece—and for a moment, I wasn't just a baker; I was part of someone's memory.
Customizing for School Colors
One of the best parts about this recipe is its flexibility. After my first batch, I realized I could color the fondant to match any school's colors, turning a generic mortarboard into something personal. I've made maroon and gold versions, navy and silver, even holographic-looking ones that caught the light beautifully. Your local cake supply shop usually has fondant in every color imaginable, or you can knead gel food coloring into white fondant if you're feeling adventurous.
Storage and Make-Ahead Magic
These cookies actually improve with a day or two of rest—the flavors settle and meld, and the texture becomes even more tender. Store decorated cookies in an airtight container with parchment between layers so the fondant doesn't stick together. I've successfully made these up to five days ahead, which is a lifesaver when you're juggling a hundred party details. Undecored cookies last even longer in an airtight container, so you can bake the bases days in advance and decorate the night before if you prefer a more relaxed schedule.
The Fondant Learning Curve
If you've never worked with fondant before, know that it's actually forgiving once you get the hang of it. It can crack if you roll it too thin or work it too long, but small imperfections are invisible once it's on the cookie. The first time I made these, I was terrified my mortarboards would look amateurish, but the fondant's matte finish somehow makes everything look intentional and polished. Here's what I've learned makes all the difference:
- Keep your work surface dusted with cornstarch, not flour, to prevent sticking without toughening the fondant.
- If fondant cracks while you're rolling, just pinch it together—seams disappear once it's on the cookie.
- Work fondant at room temperature; cold fondant is stiff and difficult, while warm fondant gets sticky and stretches unpredictably.
 Save It
 These cookies remind me that sometimes the most meaningful celebrations are built on simple foundations dressed up with a little creativity. Whether you're marking a graduation or just want an excuse to play with fondant, this recipe delivers joy in bite-sized packages.
Common Questions About Recipes
- → What type of flour is used?
All-purpose flour is used to achieve a tender cookie texture with balanced crumb.
- → How should fondant be prepared for decoration?
Roll fondant thinly, cut into small squares and cylinders for the mortarboard, and form tassels by shaping yellow fondant ropes.
- → Can these cookies be stored?
Cookies keep well in an airtight container for up to five days, maintaining freshness and decoration integrity.
- → What baking temperature is recommended?
Bake the cookies at 350°F (175°C) for about 10-12 minutes until edges turn lightly golden.
- → Are there alternative decorating options?
For quicker preparation, pre-colored fondant and store-bought dough can be used without sacrificing presentation quality.